Contents
Introduction
Assumptions
Prerequisites
Required setups prior the Security Server Installation
Create domain admin account user
SQL setup
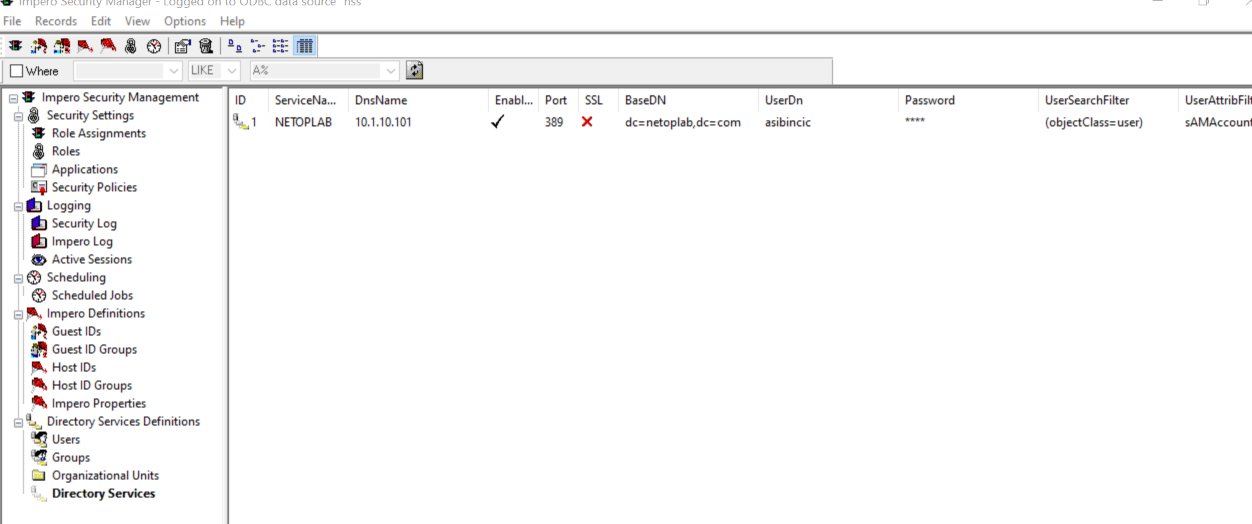
Create the NSS DB
Add the domain account user to the SQL DB
Install the Security Server
Configure the Security Server
Launch the Security Server module and run the setup wizard
Configure the Host to use Security Server
Configure the Security Role
Introduction
The Netop Remote Control Security Server is a centralized authentication server for Netop Remote Control Hosts. It can also act as a centralized log server for Netop activity from both the Netop Host and Netop Guest. The Security Server consists of two components.. One is simply called the Security Server module and it is the engine that runs, listens and processes authentication requests from the Host. The second component is called the Security Manager which is simply a GUI to edit the security roles and role assignments in the database. The Security Manager will also allow you to view the Netop activity log. This training module walks you through the installation of Netop Security Server and integration with an SQL database and the Active Directory, ensuring functionality with Netop components. This guide does not explain all options within the Security Server. For detailed information on the Netop Security Server complex functionality, see the Netop Remote Control Administrator’s Guide.
NetopRemoteControlAdministratorsGuide_EN.pdf
Assumptions
This hands on training module assumes that you have installed a Netop Guest and a Netop Host on different computers and you can make a remote control connection between the two. A MS SQL database is used for this training or there is a built in Access database if you do not have a SQL server. A SQL database is highly recommended for production environments. Just to review, the Guest controls the Host and the Security Server processes the authentication, it is not a router and once the the user is authenticated the server only collect log events if configured to do so thereafter.
Prerequisites
Before you begin you will also need to obtain the Netop Remote Control Security Server MSI and a valid serial number.
Required setups prior the Security Server Installation
Create domain admin account user
On the Active Directory server create a domain account:
1. Go to Start>Programs>Administrative Tools, and click Active Directory Users and
Computers.
2. In the Active Directory Users and Computers window, expand <domain name>.
3. Right-click Users, point to New, and select User.
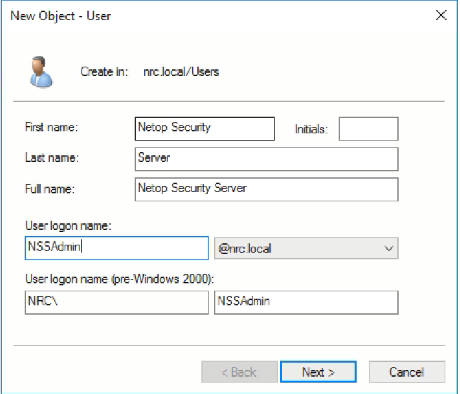
4. In the New Object - User dialog box, do the following:
• In the First name and Last name fields, type a first and last name for the account.
• In the User logon name field, type the username that will be used to log on to the Active Directory domain.
5. Click Next.
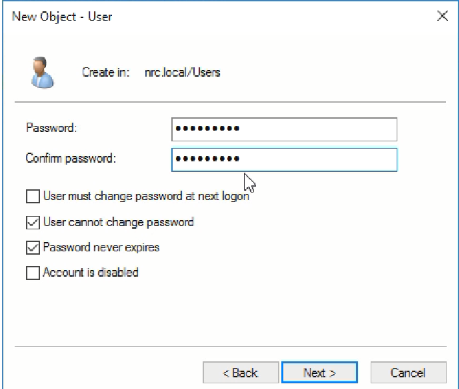
6. In the Password field, type a password for the account, and then in the Confirm password field, type the password again.
7. Select User cannot change password and Password never expires:
8. Click Next, then click Finish. The domain account users will be added to the domain.
Note: To install Security Manager, you must be an administrator or a user with local administrator rights to the server and with access rights to the Windows Server console and owner permissions to the database if using Windows Authentication for SQL server.
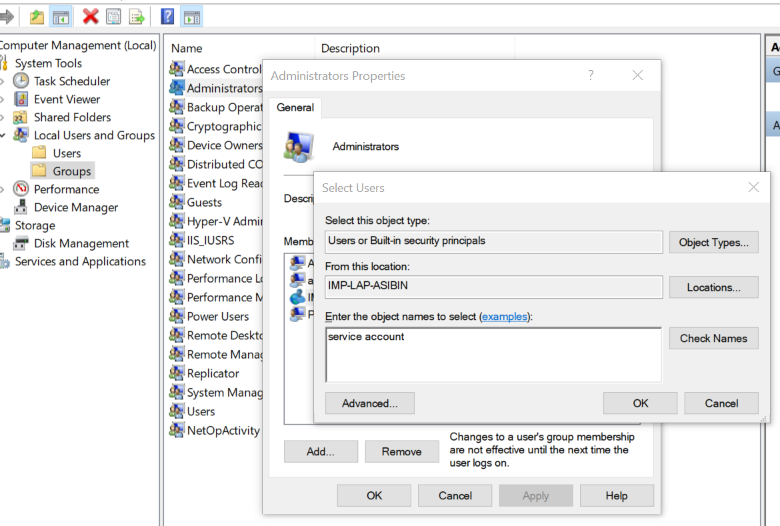
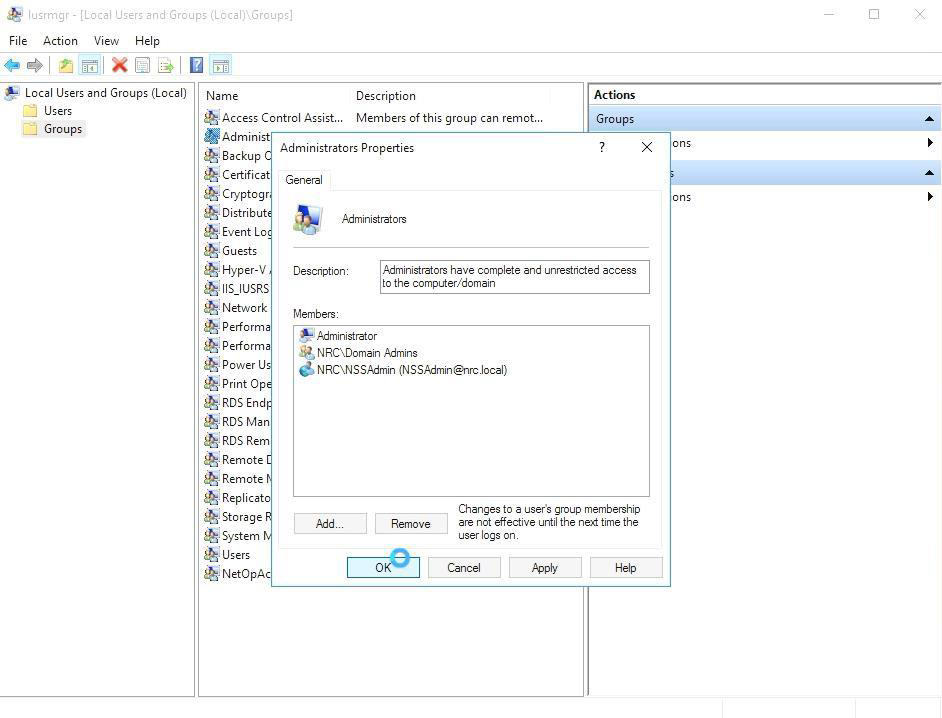
Give the domain service account administrative privileges on the server by adding it to the local administrators group.:
Add the domain account user to the SQL instance.
Add the domain account user to the SQL DB with Owner permissions. (SQL user with owner permissions is also supported. Typically in large organizations a Domain user is the more secure method)
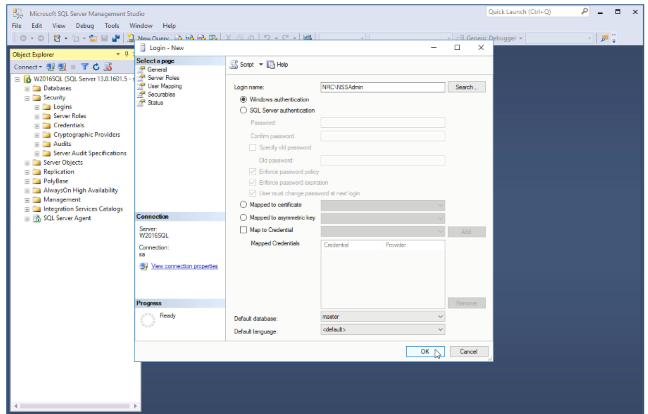
1. In SQL Server Management Studio, open Object Explorer and expand the Security folder.
2. Right-click the Logins folder and click New Login....
3. Search for the domain account user and make sure to select Windows authentication.
4. Click OK.
SQL setup
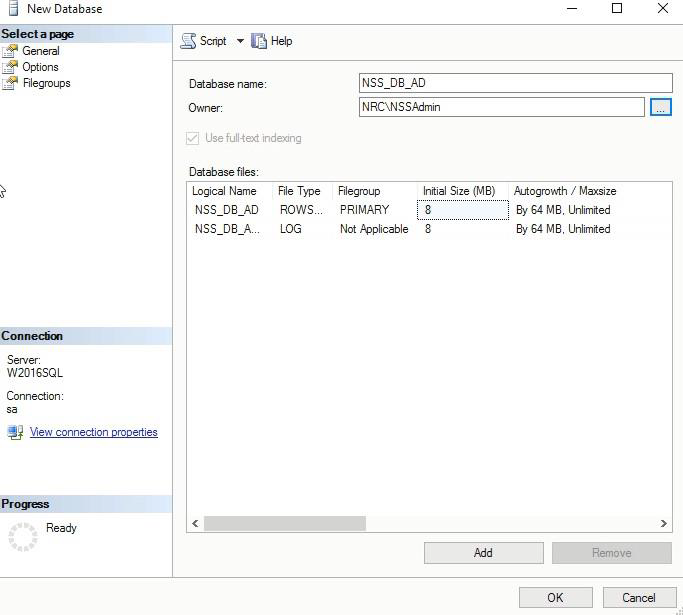
Create the NSS DB
In the Object Explorer, right-click the Databases folder and click New Database... In the New Database window, type a name for the Netop Security Server database and make the domain account user the DB owner.
Click OK.
Install the Security Server
Prerequisite: On the machine where you will install the Netop Security Server, add the domain admin user to the Windows Local Administrator list.
1. Log into the Windows Server console using the account with local administrator rights (the one mapped with the NSS DB on the SQL server). If console access is unavailable you can use RDP but please see this article for how to do that) Installing Security Server using RDP
2. Go to the folder you have saved the Netop Remote Control Security Server MSI and double-click it. The Netop Security Server – Setup will be displayed. (You may need to start the MSI from a CMD prompt started as administrator depending on the security polices on the server)
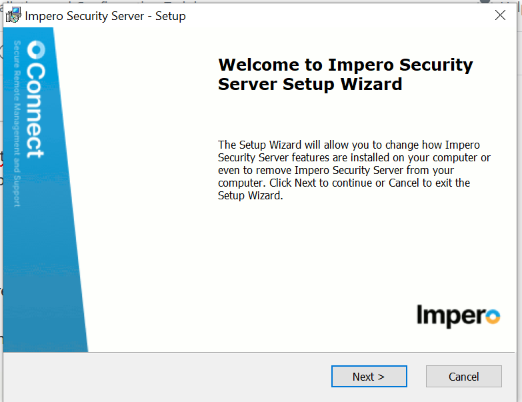
3. Click Next.
4. Accept the Netop End-User License Agreement.
5. Click Next.
6. Enter the username, organization and the Netop Security Server Serial Number (sometimes referred to as the License Key).
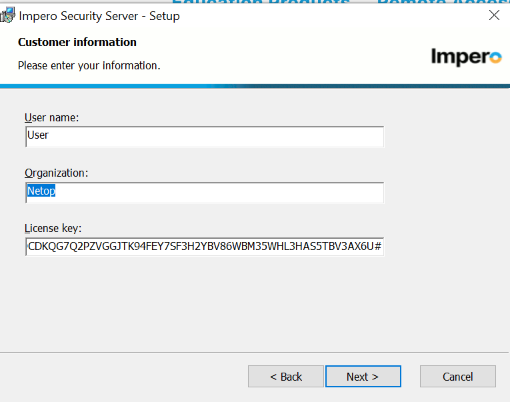
7. Click Next.
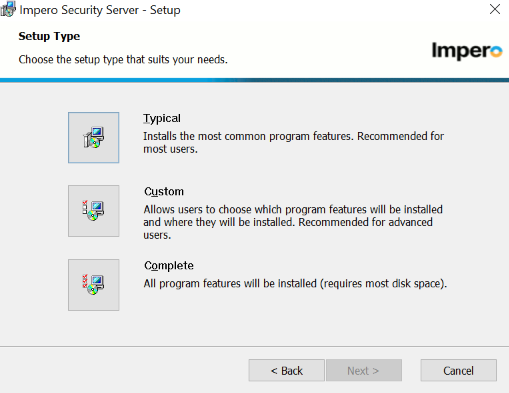
8. Select the Typical setup type.
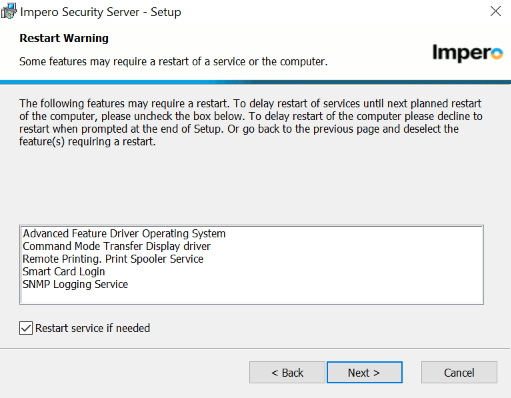
Some Netop features might require a restart of the Netop service or the computer.
9. Make sure that the Restart service if needed option is checked.
10. Click Next.
11. Make sure that the Allow Netop Security Server to accept incoming network connections option is checked.
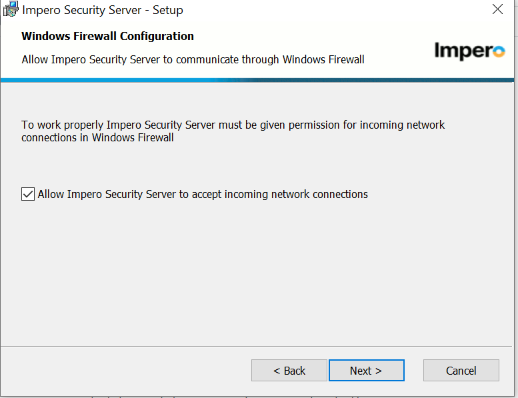
12. Click Next.
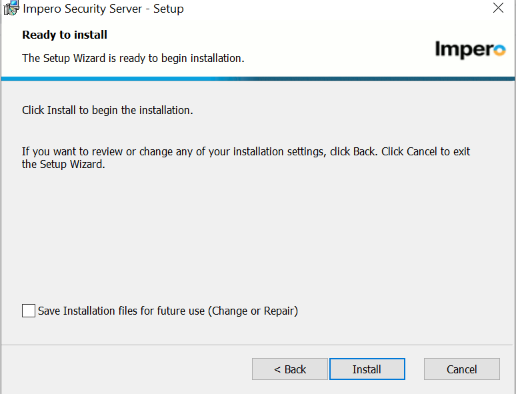
13. Optionally, you can choose to Save Installation files for future use (Change or Repair).
14. Click Install.
IMPORTANT: Uncheck the Launch the Netop Security Server Product checkbox.
15. Click Finish.
Configure the Security Manager
1. From the Windows desktop go to the Start > All Programs > Netop Remote Control and run as administrator the Security Manager. The Netop Security Manager Setup Wizard will be displayed.
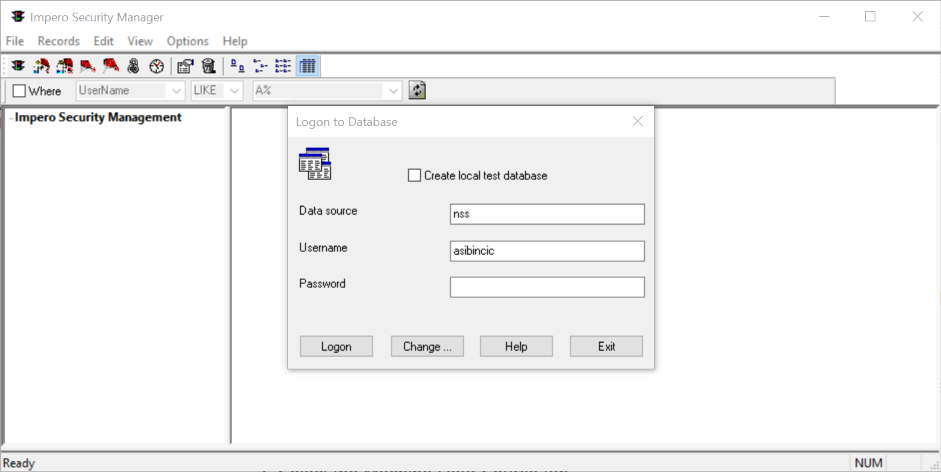
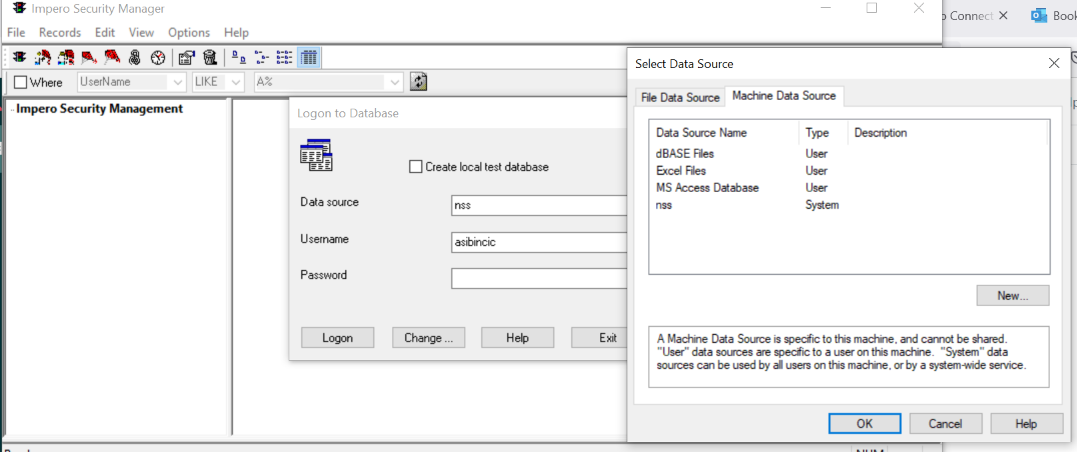
2. In the Logon to Database dialog box, make sure that the Create local test database option is not selected and click Change. The Select Data Source dialog box will be displayed.
3. Select the Machine Data Source tab.
4. Click New.
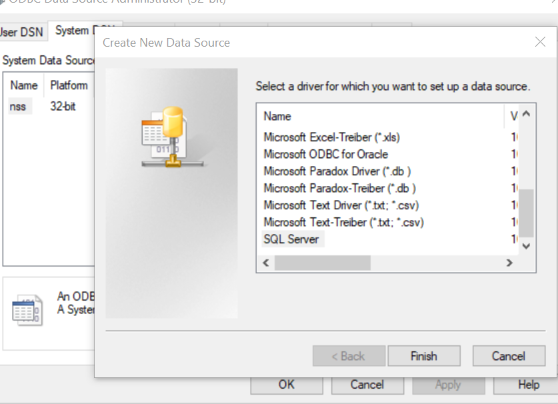
5. In the Create New Data Source dialog box, select System Data Source (Apply to this
machine only).
6. Click Next.
7. Select SQL Server as driver for which you want to set up a data source.
8. Click Next, then click Finish. The Create a New Data Source to SQL Server wizard will be displayed.
9. Type a name for the data source and from the Server drop-down list select the MS SQL server you will connect to:
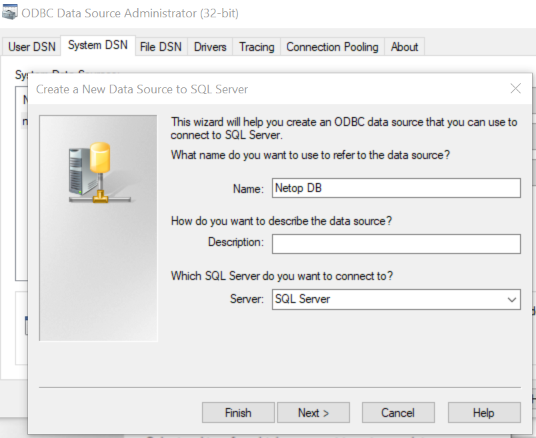
10. Click Next. Make sure that the following options are selected:
• With Windows NT authentication using the network login ID
• Connect to SQL Server to obtain default settings for the additional configuration options.
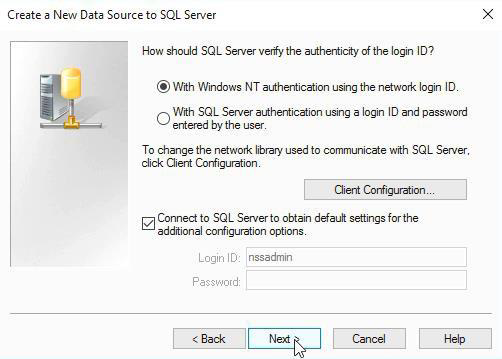
11. Click Next.
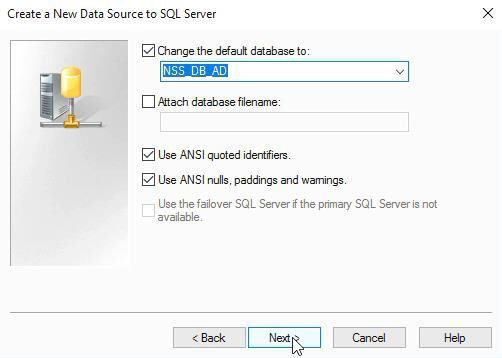
12. Select Change the default database to <the Netop Security Server DB, as defined in the SQL Server>:
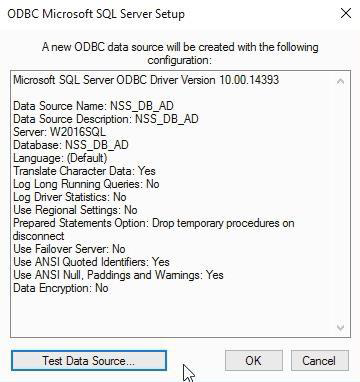
13. Click Next, then click Finish. The ODBC Microsoft SQL Server Setup dialog box will be displayed:
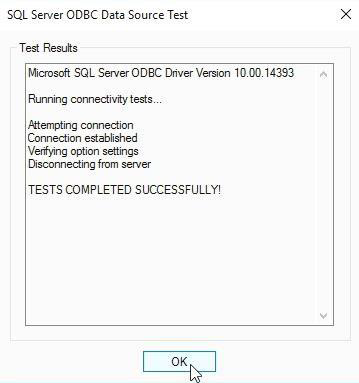
14. Test the data source. If successful, click OK.
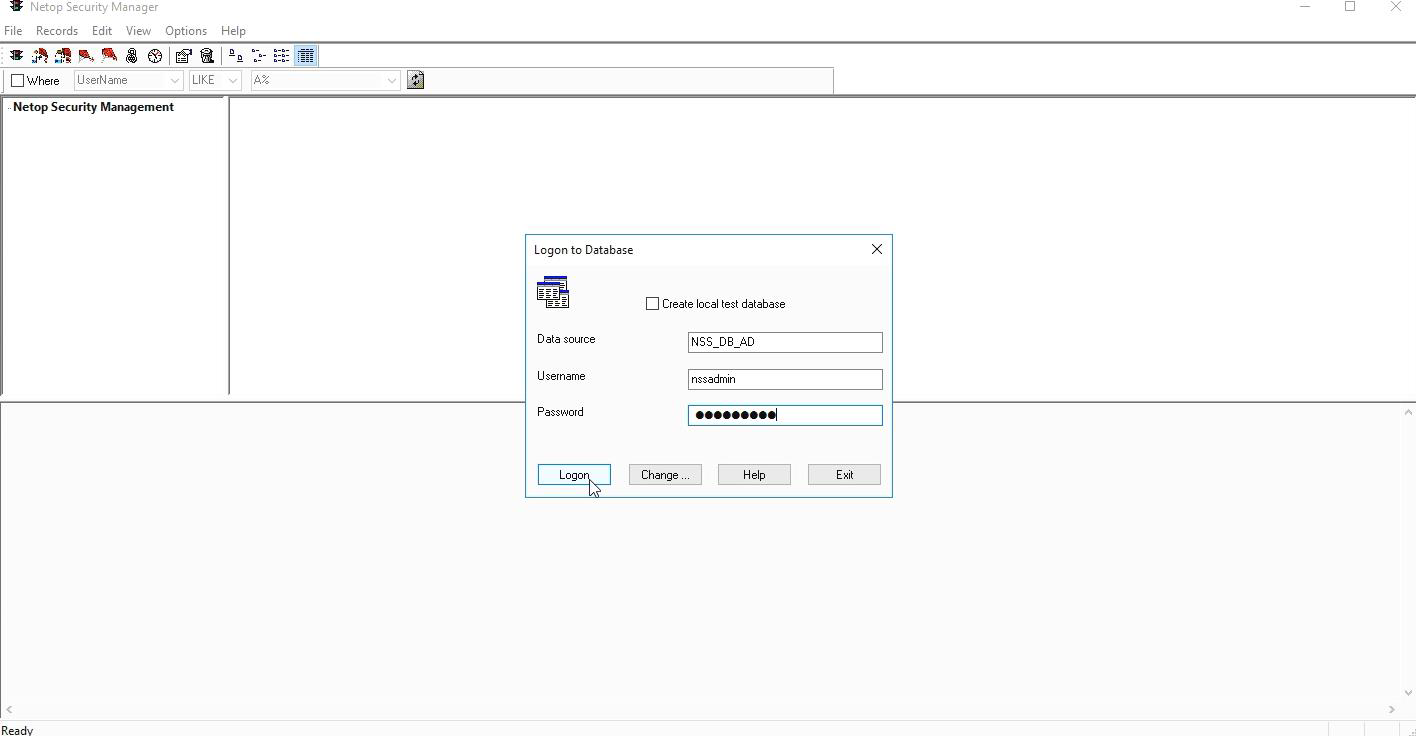
15. Click OK three times to reach the Logon to Database dialog box. If you are using Windows authentication the logged in Windows user credentials will be passed through to the SQL server regardless of what credentials are entered so actually no credentials are needed.
16. Enter the username and password if using a SQL user otherwise just click Logon, the logged in Windows user credentials will be used in the background to authenticate to the SQL server and database. It's recommended you familiarize yourself with SQL authentication.
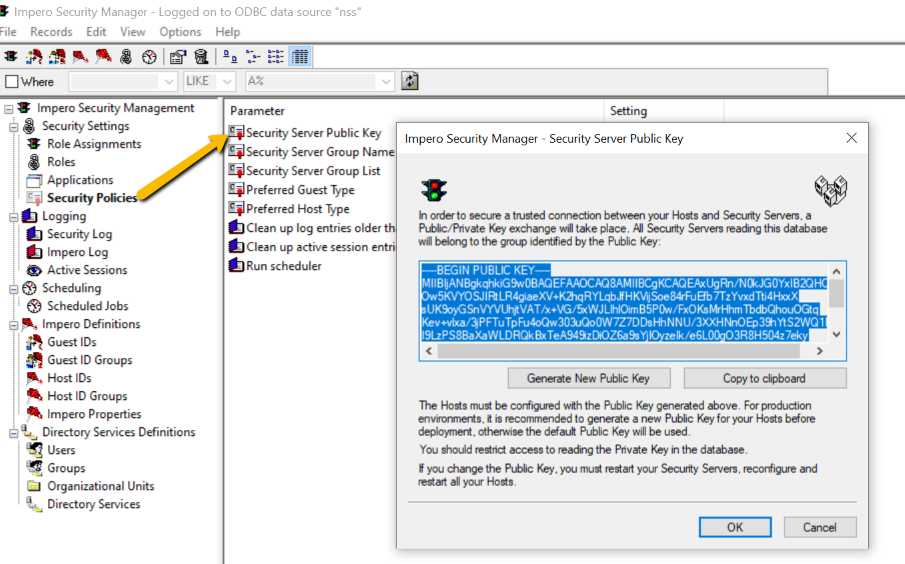
17. In the Netop Security Manager – Go to the Security Server Public Key dialog box, click to Generate New Public Key.
18. Click Generate New Public Key.
19. Select the public key generated then click Copy to clipboard.
20. Click Next twice.
21. In the Group Name (Private) field enter your domain and re-enter it in the Confirm Group
Name field.
22. Click Next. The Security Server list will be displayed. The name of your Security Server will appear in the server field.
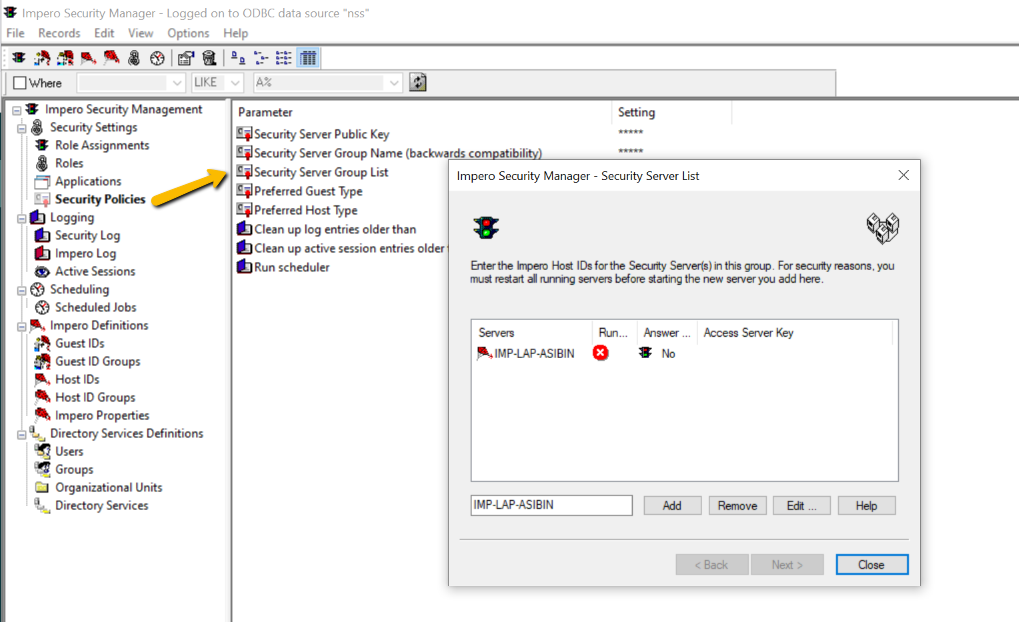
23. Click Add to add your Security Server to the database, then click Next.
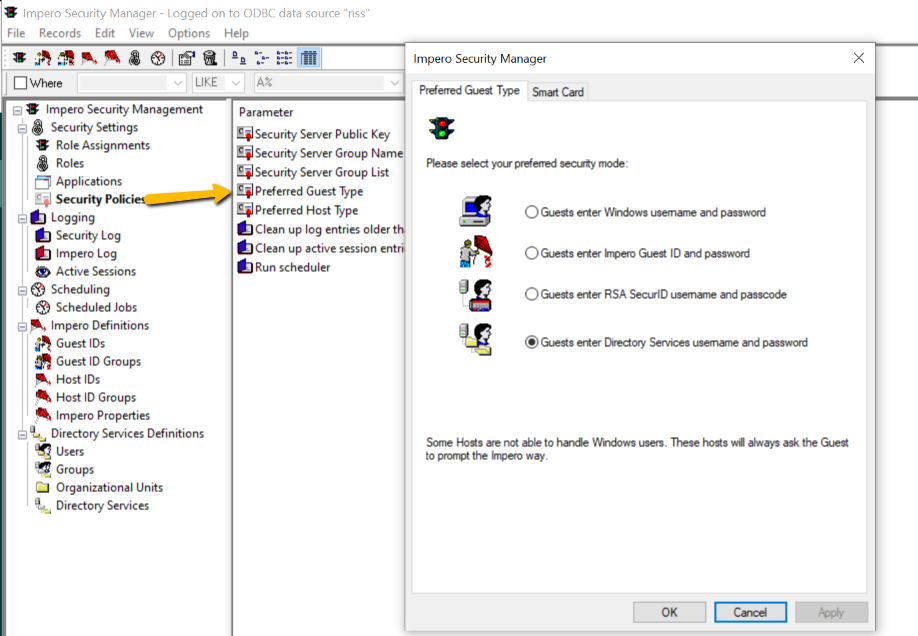
24. Select Guests enter Directory Services username and password.
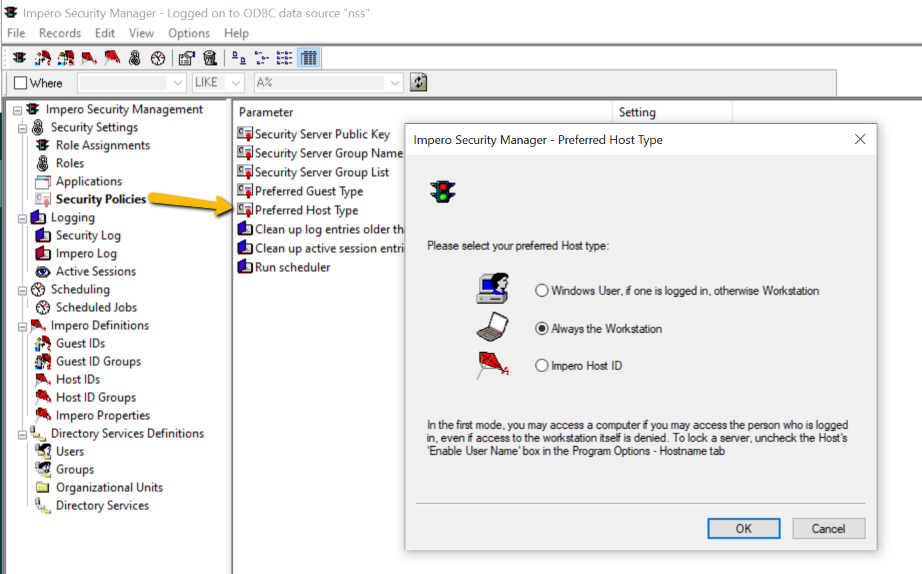
25. Click Next and select Always the Workstation. (This assumes the computer that is running the Host is joined to a domain) The "Windows User if logged in, otherwise workstation" choice queries the Host computer for the logged in user first to apply a role, if no user is logged in, the server will look for a role for the computer record to allow access. This makes it possible to apply an access role based on who is logged onto the computer to allow or deny access. "Netop Host ID" is for use cases where the computer the Host is running on is not in a domain or it is not practical to query the domain to determine the access rights. This instructs the server to look at the local database for the computer record to determine the role based access.
26. Click Next, then close Netop Security Manager.
Open a txt file and paste the Security Server Public Key you have previously saved to clipboard.
Launch the Security Server module and run the setup wizard
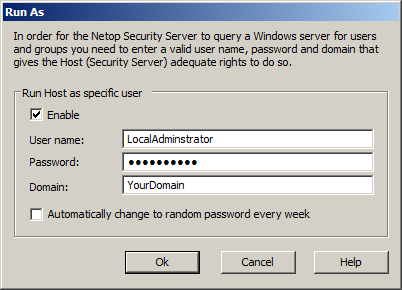
1. From the Windows desktop go to the Start menu and select All Programs > Netop Remote Control > Security Server>Tools>Program Options>Run As... It is required that you select to Run Host as specific user by checking the Enable box.
2. Enter Windows credentials that have been added to the Local Administrators Group on this server. This instructs the Security Server application (NSSW32.EXE) to run under the domain user context for the correct permissions and access to the database.
3. Click OK. The Netop Security Server Setup Wizard will be displayed.
4. Click Next.
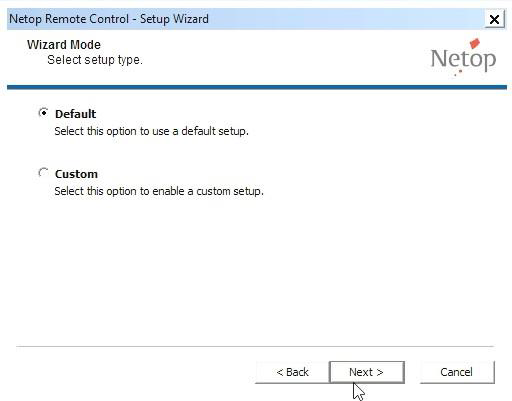
5. Make sure that the Default option is selected.
6. Click Next.
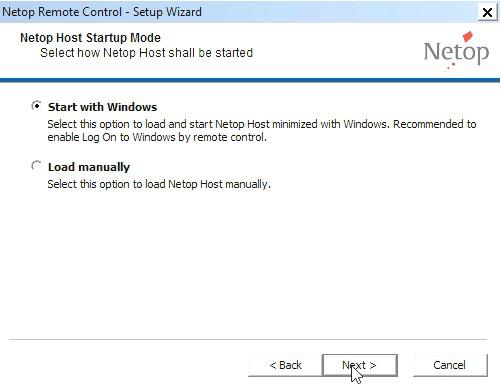
7. Make sure that the option to Start with Windows is selected.
8. Click Next.
9. Enter a secure password that can be used later to remote control the Security Server from your Netop Guest. Make sure to confirm the password. This setting can be "hardened" later by requiring a Windows user for authentication.
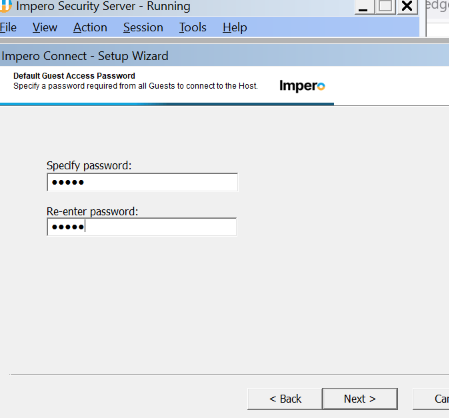
10. Click Next.
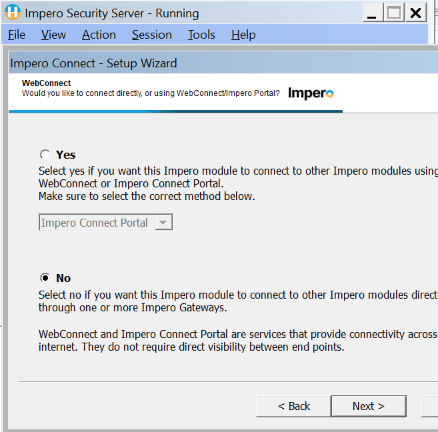
11. Make sure that you choose not to configure the Portal by selecting No.
12. Click Next.
13. Select the No, I do not want to register my Netop License now option.
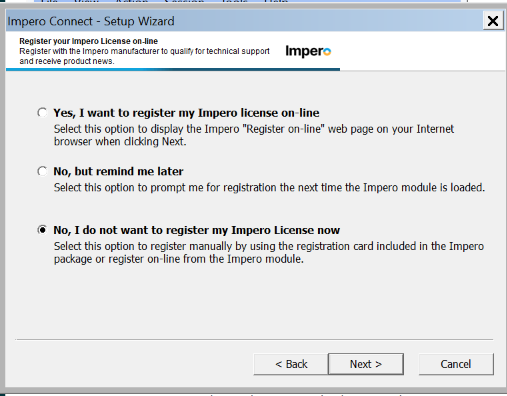
14. Click Next.
15. Click Finish.
16. The Netop Security Server is now running. The Netop Security icon appears in the system tray.
17. Right click on the icon and select Restore.
18. Go to the Tools menu and select Security Server Setup. The database setup will be displayed.
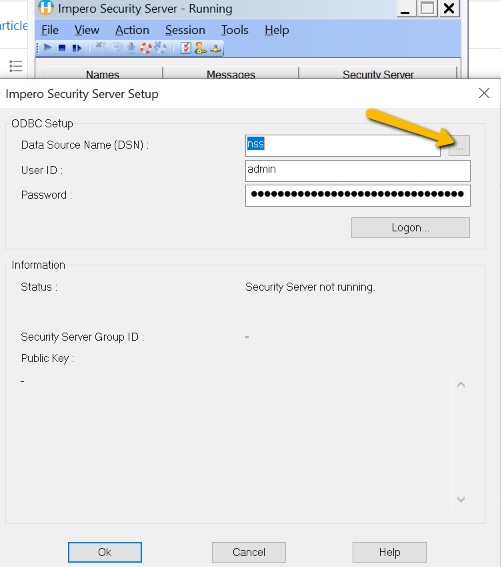
19. In the upper-right corner of the page, click the ellipsis button. The Select Data Source page will be displayed from where you will select the desired database.
20. Click the Machine Data Source tab, select the Netop_Security_Evaluation data source name and click OK.
21. No need to enter credentials; just click OK.
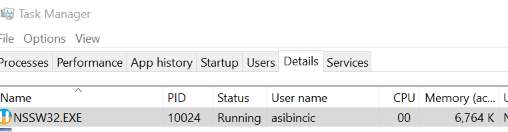
You can verify that the Security Server process is running under the correct user context in the Task Manager>Details tab
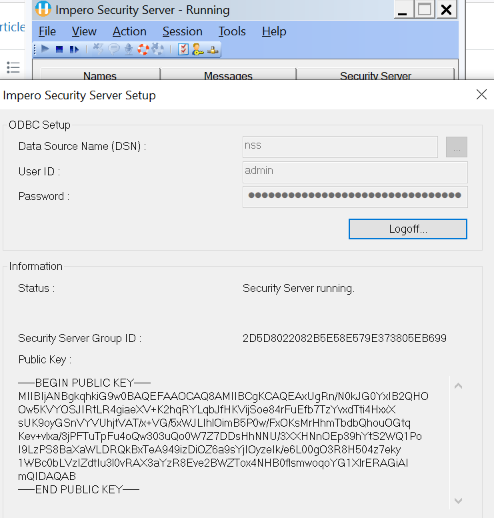
22. Click the Logon button.
23. Wait until you see the Information Status: “Security Server running.”
24. Click OK.
25. Restart the Netop Security Server Helper Service in Windows Services..
Configure the Host to use Security Server
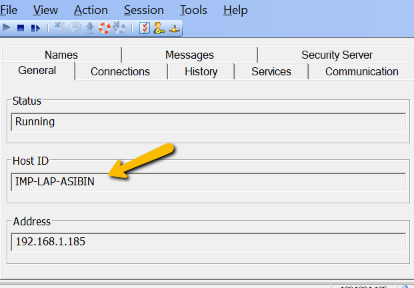
1. Open GUI of the Host you want to use with Security Server.
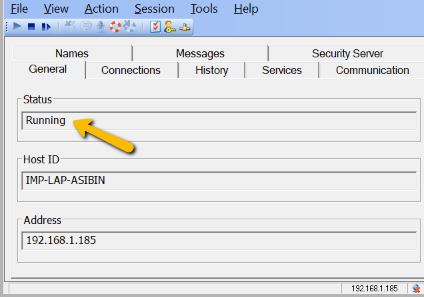
2. Make a note of the Host ID as it is displayed in the General tab. You might want to use this ID later when making role assignments in the Security Manager.
3. On the main menu click Tools and select the Communication Profiles option. The
Communication Profile Setup will be displayed.
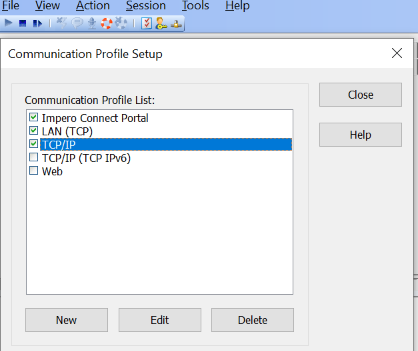
4. Make sure that the TCP/IP communication profile is selected. Click on it then click the Edit button.
5. Click the IP Broadcast list… button.
6. Click the Add button.
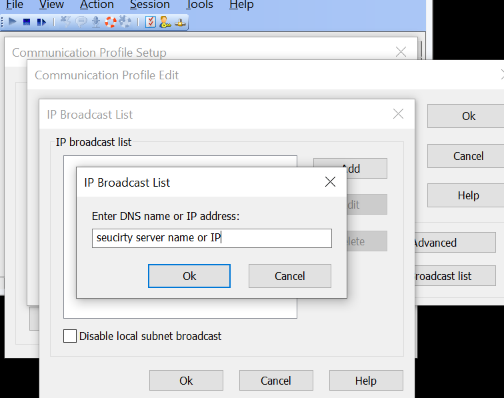
7. Enter your Security Server’s DNS name or IP address and click OK.
8. Optionally, you might deselect to Disable local sub-net broadcast. This will reduce network traffic.
9. Click OK twice then click Close. You will be prompted to restart the Host. Also restart the Netop Helper Service in Windows services. This caches the Server name or IP in memory for faster access. If the IP or DNS name changes on the Server you will need to restart this service as this information only updates when the service is restarted.
10. Click OK.
11. On the main menu, click Actions and select Restart.
12. Once the Host’s status returns to running on the main menu click Tools and select the Log
Setup option.
13. Select the Log on Netop Server option. This wail instruct the Host to send all activity log events tot eh Server database for easier log collection methods. These can also be automatically exported in a "syslog" format for ingestion into other log repositories.
14. Click the Netop Server tab.
15. Click the Select All button to enable logging of all Netop events.
16. Click the Browse… button.You will be prompted to wait until the Log Servers list will be
displayed. Your Netop Security Server will be shown in the list.
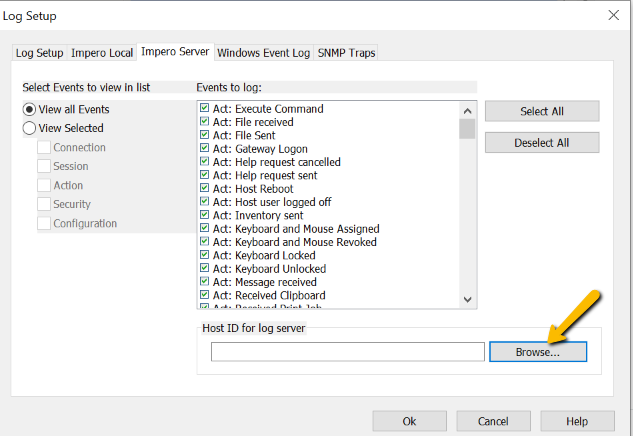
17. Select the server name from the list and click the Select button.
18. Click OK. The Netop Host is checking if the log server is available.
19. On the main menu click Tools and select the Guest Access Security option.
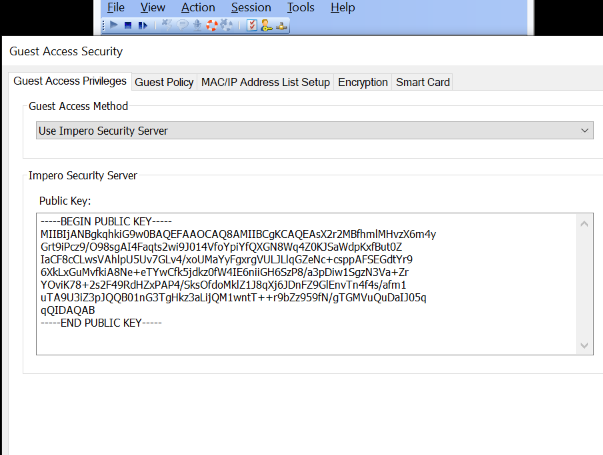
20. From the Guest Access Method drop-down list select the Use Netop Security Server option.
21. Copy and paste the Public Key from the Public Key text file that you made while setting up the
Netop Security Manager.
22. Click OK.
Configure the Security Role Assignment
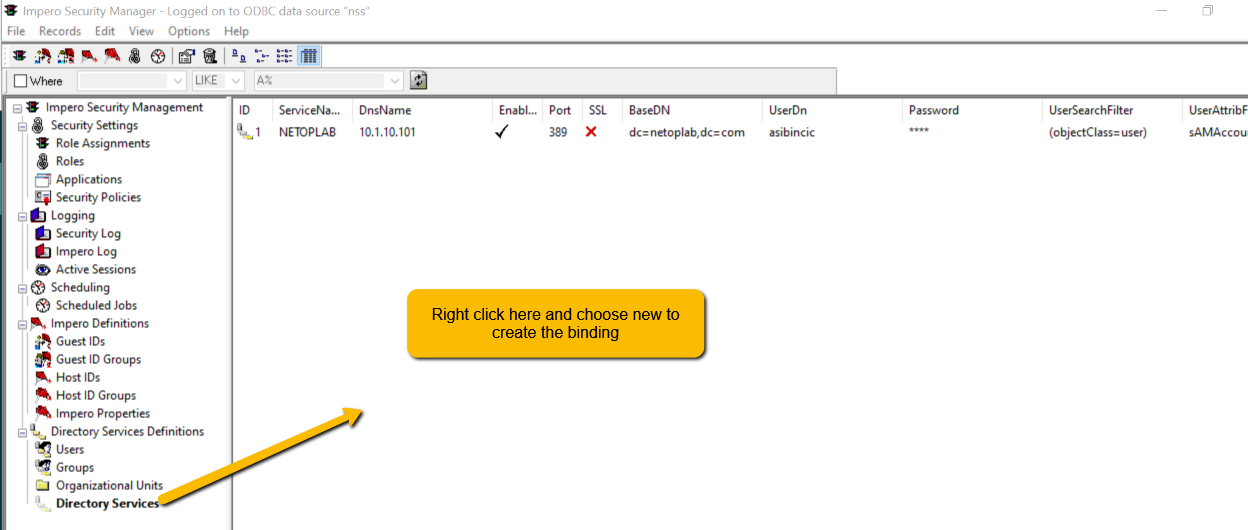
1. Return to the Netop Security Server computer and open the Netop Security Manager.
2. Verify you have configured the connection binding to the AD where the Guest users reside.
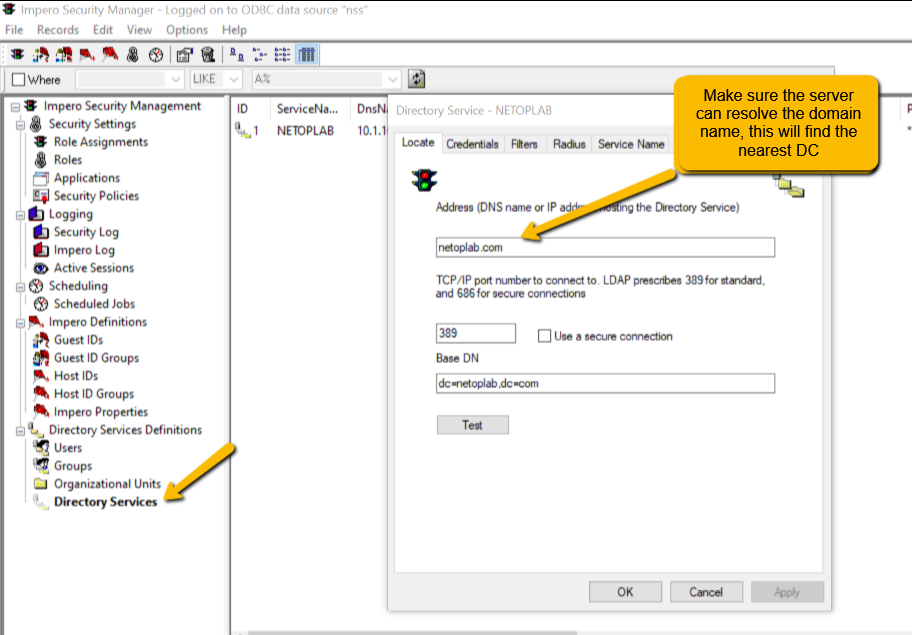
Enter a service account credentials for read access to lookup and validate username and group membership.

Choose the Active Directory default search

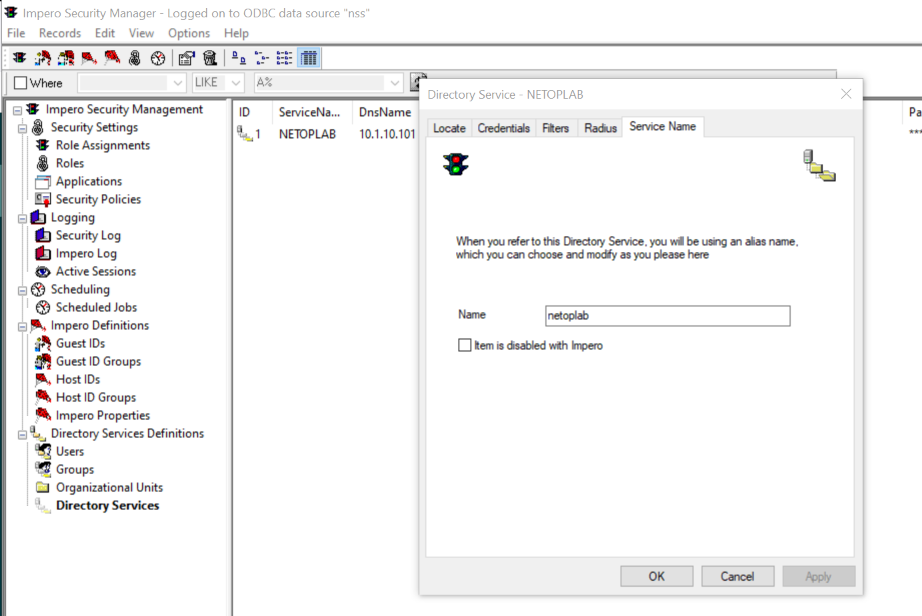
Enter the domain name as the users are accustom to entering the domain when authenticating, this field can be any string but must match the "Directory Server" filed in the authentication box in the Guest.
Once the binding setup wizard is complete click OK and it should enter a record that looks like this....
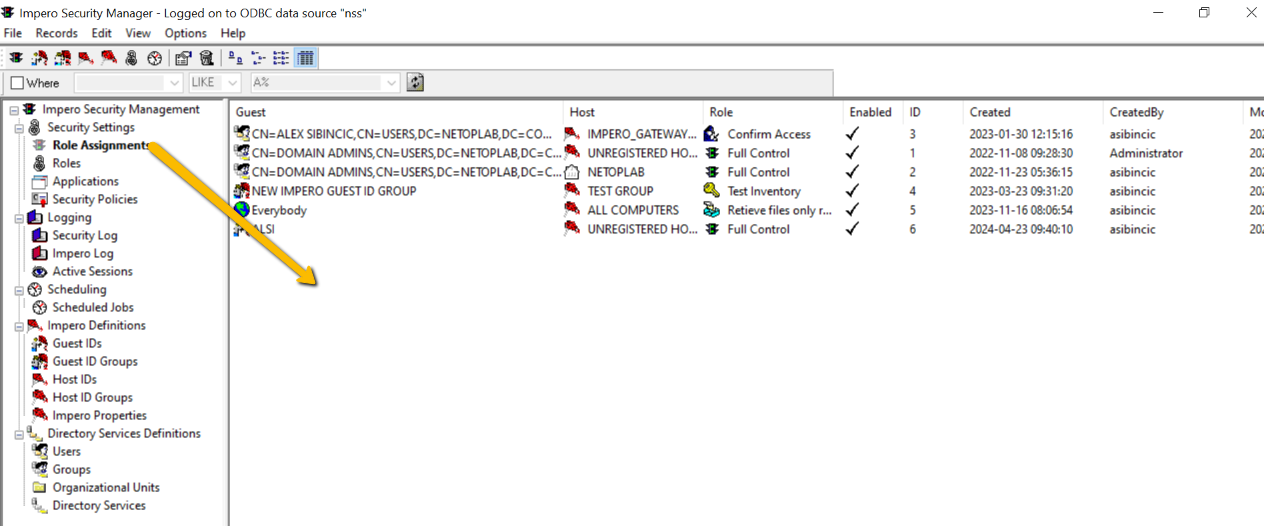
3. Next go to the Role Assignment section and right-click on the right side of the window and select New to create the Role Assignment. This is the security policy that will allow access to the remote computers running the Host module.
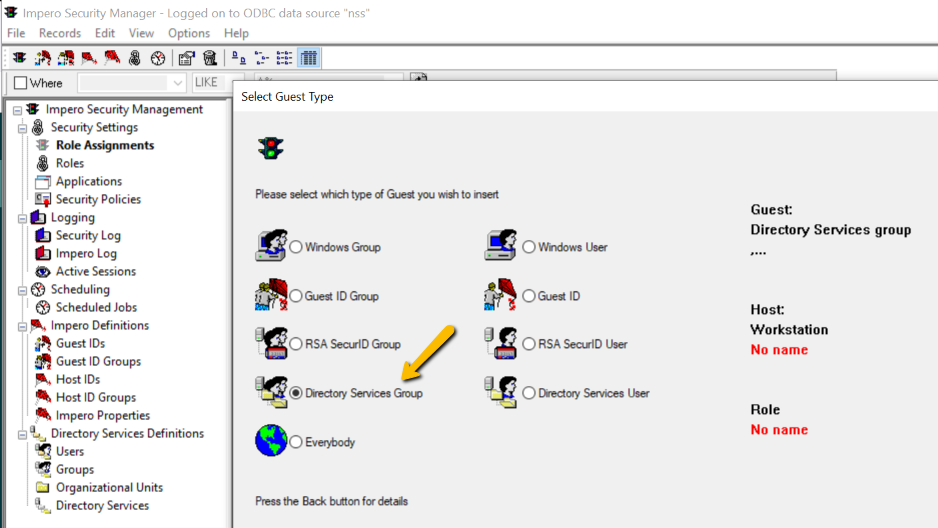
4. Next choose Directory Service Group and find the AD security group for the Guest users.
5. In the Select Guest Type dialog box select Guest ID and click Next.
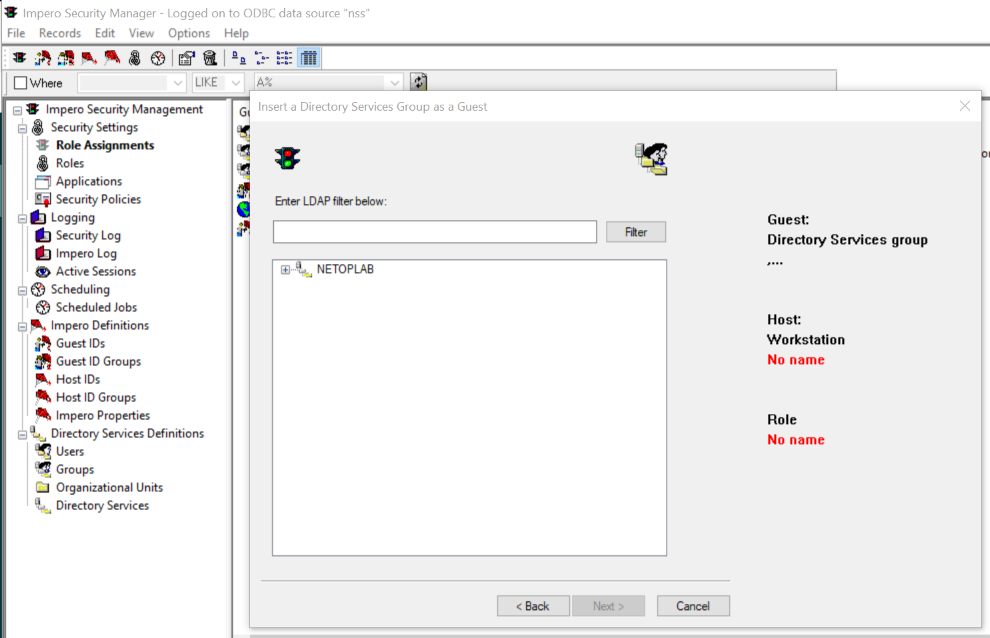
6. Choose the AD security group you want to give access to the computers running the Host module for remote access. Click Next. You can also choose one AD user. For a more detailed discussion on all the choices see page 10 of this document: Security Server Administrator Guide
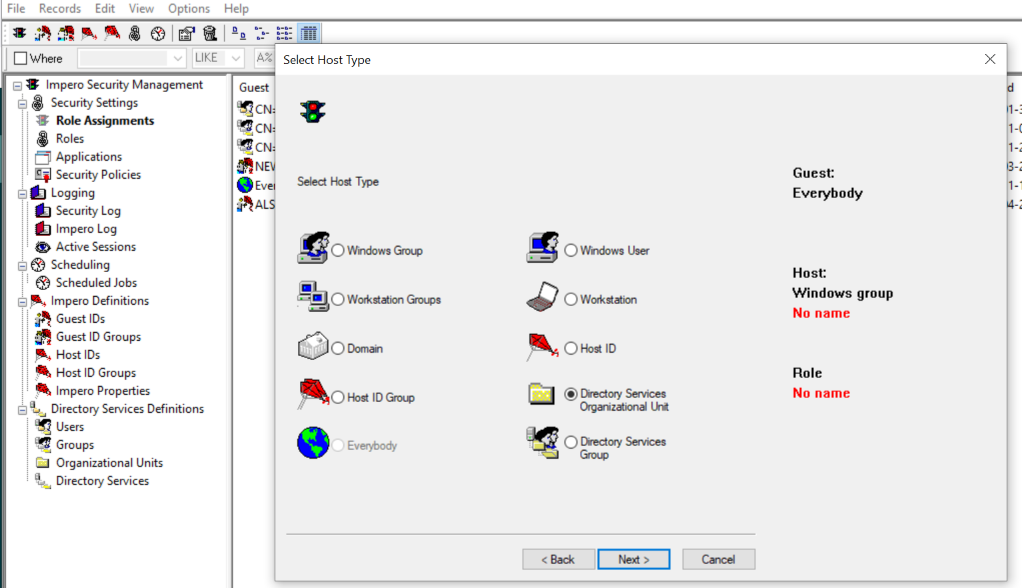
7. Select the Directory Services Group option and click Next. This can also be an OU where the Host records reside or select the Domain if the User or Group can control any computer running a Host in the environment.
10. Browse or enter the Group or OU where the target computers are in the AD. If the computers are not in the domain the "Netop Host ID" preferred Host type must be used, this instructs the Server to look at the local Server database for the Host ID records to validate access. Click Next.
11. The Full Control security role is selected by default. Click Finish. For more details on the Role options see page 33 of this document Security Server Administrator Guide
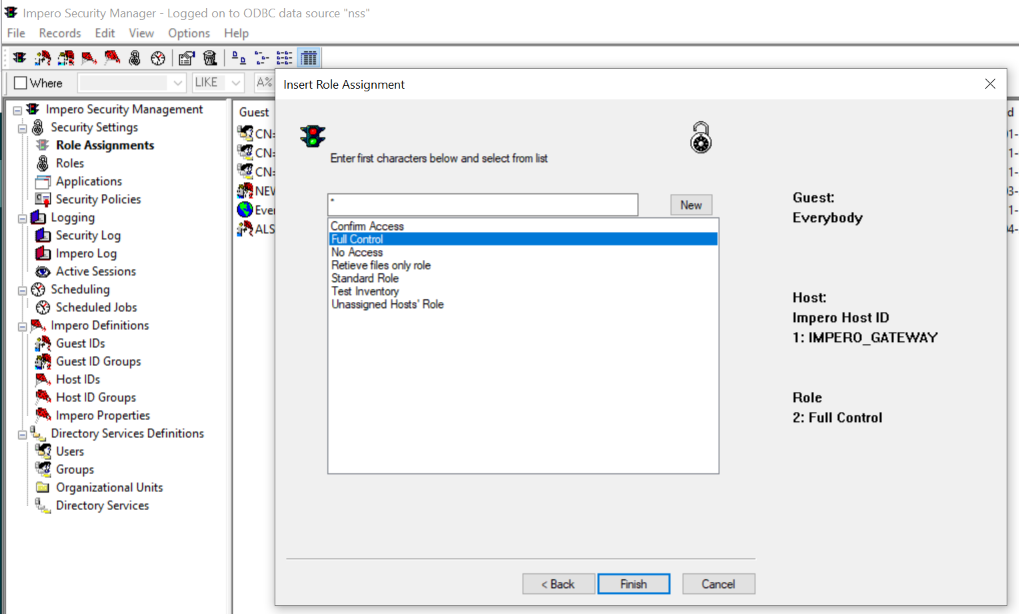
You have now completed your first role assignment for testing.
If you have configured everything correctly will now be able to connect from your Netop Guest to the
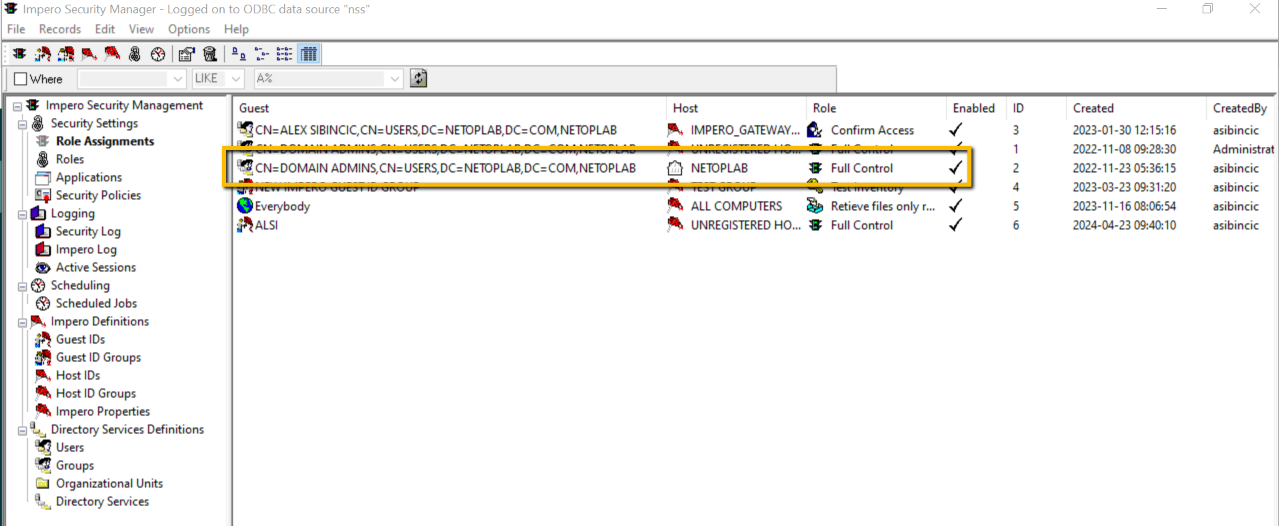
Netop Host using Security Server authentication and Security Server logging. The role assignment will have the Group or User that has access, then the group of Hosts they are allowed to control, then the role that will apply once they access the Host computer.
For a more detailed discussion about configuration options and other information please refer to this these links:
https://support.netop.com/a/solutions/articles/205000041684
Knowledge check:
- Explain why an organization would use the Security Server module?
- What are the options for authentication when using the Security Server?
- Which of these would be considered the modern and most secure method of authentication?
- What OS is best suited for running the Security Server module.
- Which SQL authentication method requires a domain user and why?
- Describe the differences in the "Preferred Guest type" choices, why would an organization choose one or the other?
- Describe the differences in the Preferred Host type choices, why would an organization choose one or the other?
- Which "Preferred Host Type" would you choose if the computers running the Host module are not joined to a Domain?
- If a console session is not available and only RDP is available to access the server, describe what are the steps required to run the Security Server application in the RDP session?
- How are the SQL tables/schema created when working with the Security Manager?
- Which SQL table contains the Event Logs?
- Which port and protocol are used to communicate from the Host to the Security Server?
- What is the purpose of the "Public Key" for authentication using the Security Server?
- Describe what a "Role Assignment" is?
Was this article helpful?
That’s Great!
Thank you for your feedback
Sorry! We couldn't be helpful
Thank you for your feedback
Feedback sent
We appreciate your effort and will try to fix the article