Contents
Overview
Netop Connect provides remote access and KVM control to nearly every platform or device using a proprietary connection protocol that rides over TCP, UDP and/or HTTPS. Deployment options can be On Premises or Public cloud SaaS or a combination of both or VPC. Review these manuals on this page: Manuals and Guides
Remote Access use cases - how it is used.
Netop Connect enables IT teams to remotely support and manage workstations, servers, Point of Sale devices, embedded systems, virtual environments, VDI desktops and mobile devices:
- Help Desk – end user support that requires console access, file transfer and remote power shell and a variety of other features.
- ATM – Impero partners with NCR, Diebold, Hyosung as their preferred remote access platform for IT teams that support ATM computers.
- Point of sale - Partner with Toshiba on their “4690 TcxSky” platform used by the largest retailers in the world, also Windows based Point of Sale use cases at large retailers like Dillards. 4690 TcxSky is a proprietary OS designed for POS systems originally developed by IBM.
- Manufacturing – Connect is used by many manufacturing plants because of security and segmented, highly secure networks.
Security & Compliance is the main differentiator with competitors.
Netop Connect enables access while using end-to-end 256-bit AES encryption, advanced authentication protocols, granular access rights management. Full auditing capabilities help businesses satisfy compliance standards, including PCI-DSS, GDPR, HIPAA, FIPS and ISO 27001. See "Security White Paper" for more details.
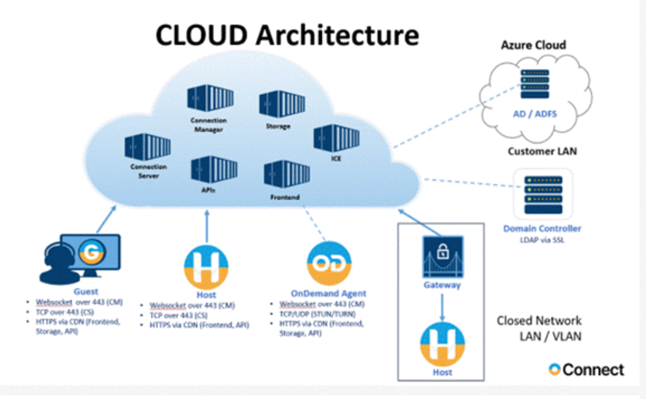
Operation – Traffic Flow
The components needed to establish a remote session consist of a “Host” agent that runs on the device you want to remotely access, and the “Guest” module, the client that is installed on the device where the remote session will initiate from. With Connect the Guest controls the Host.
The Host is installed as an application (NHSTW32.EXE), and a Windows service (NHOSTSVC.EXE) and as a Daemon process (Imperohostd) on Linux and Mac OS to allow for “unattended” access, remote user interaction is not required once the Host software is installed. By default the Host agents will start automatically and listen for connections on TCP and UDP ports 6502 (default ports can be modified) and on the cloud-based portal on port 440 HTTPS or any combination simultaneously.
With an On-Premises implementation the Guest (ngstw32.exe) user will initiate a connection through the LAN/WAN/VPN by entering an IP address or resolvable computer name into the Guest module interface, access rights can be configured locally on each Host, or using a centralized server module called the Security Server.
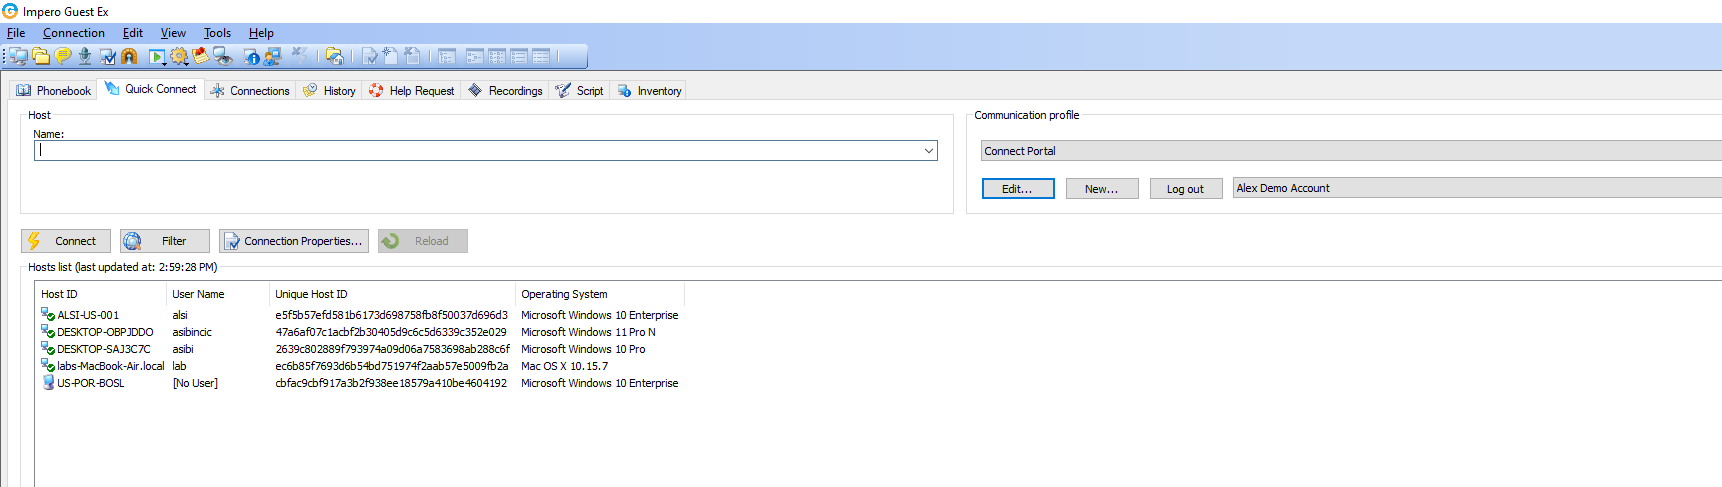
If the Portal is used, the Guest user authenticates through an interface on the Guest when the Portal communication profile is chosen and can access remote Hosts through the Guest module, upon login the user will receive a list of devices allowed by the Portal Connect administrator using security policies, what we call “Role assignments”. Article detailing role assignments in Portal
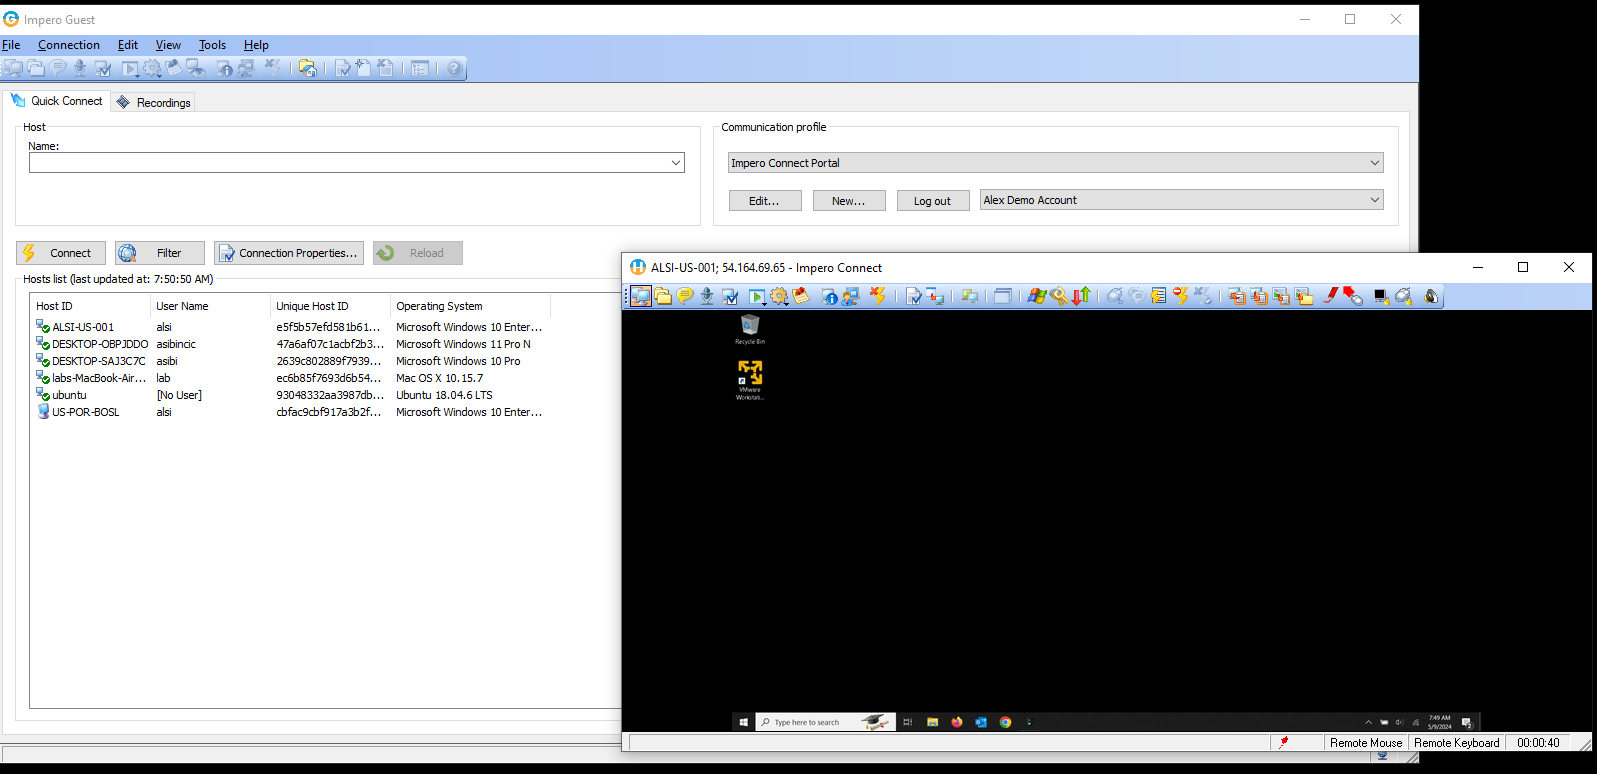
To start a remote session the Guest user will double click or right click on the device in the list to start a session that will control KVM to the console session, or start a file transfer session, start a command prompt, or the many other options available. See users guide for details: Netop Users Guide
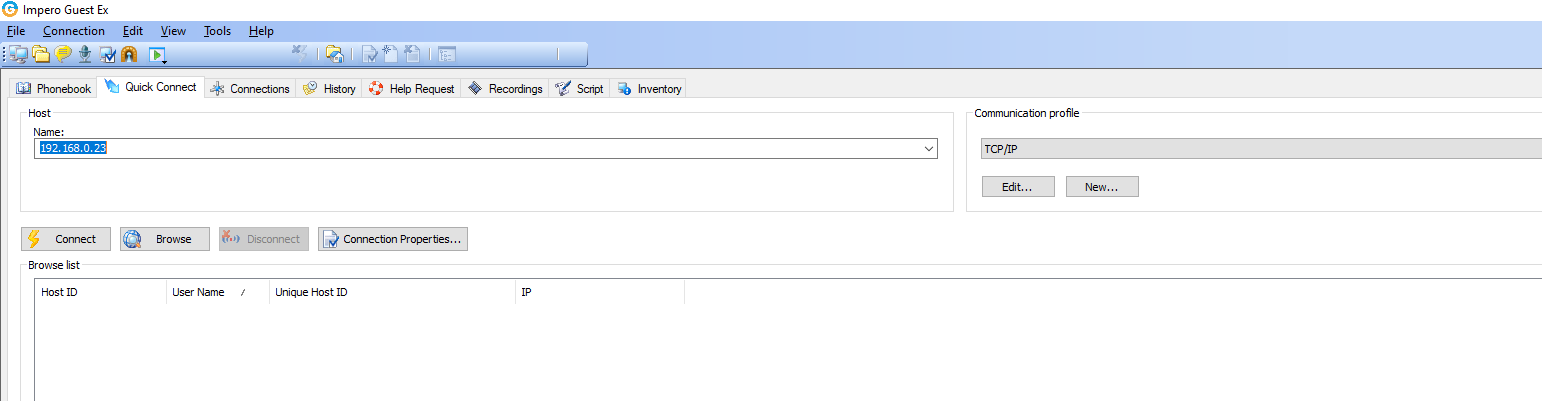
Guest Interface:
Browser interface: KVM control only supported.
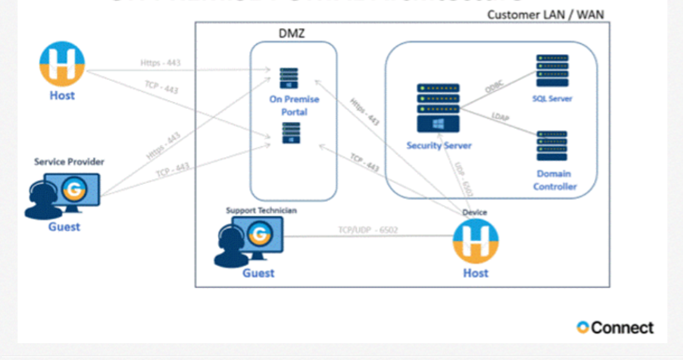
Typical on-premise network flow, DMZ entry is removed if on premise portal is not used:
Deployment options
Connect Portal
The Connect Portal is a multi-tenant solution hosted in AWS for public access.
The Portal has two primary functions:
Communication relay – the Portal acts as a secure relay service to
connect the Guest and Host modules through the Internet and internal resources that have access to a Portal instance. Link to whitelisting requirements for Portal access: Portal Whitelisting Requirements
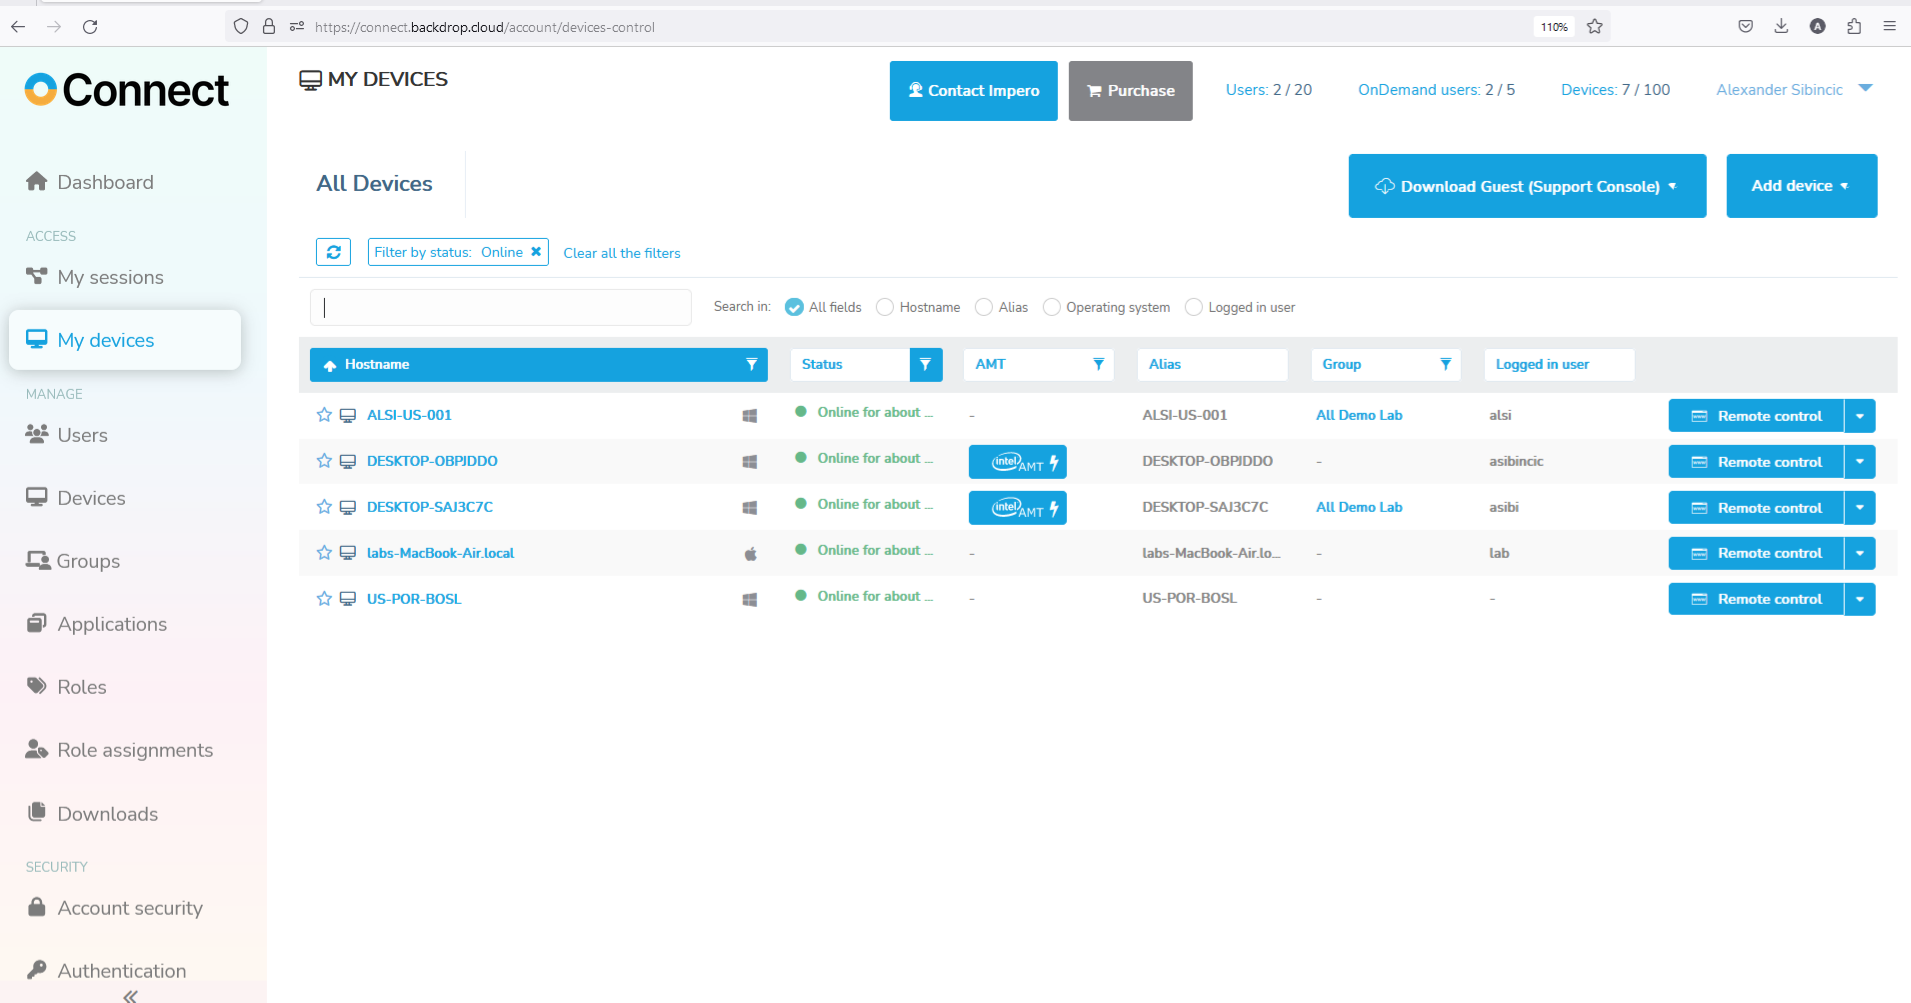
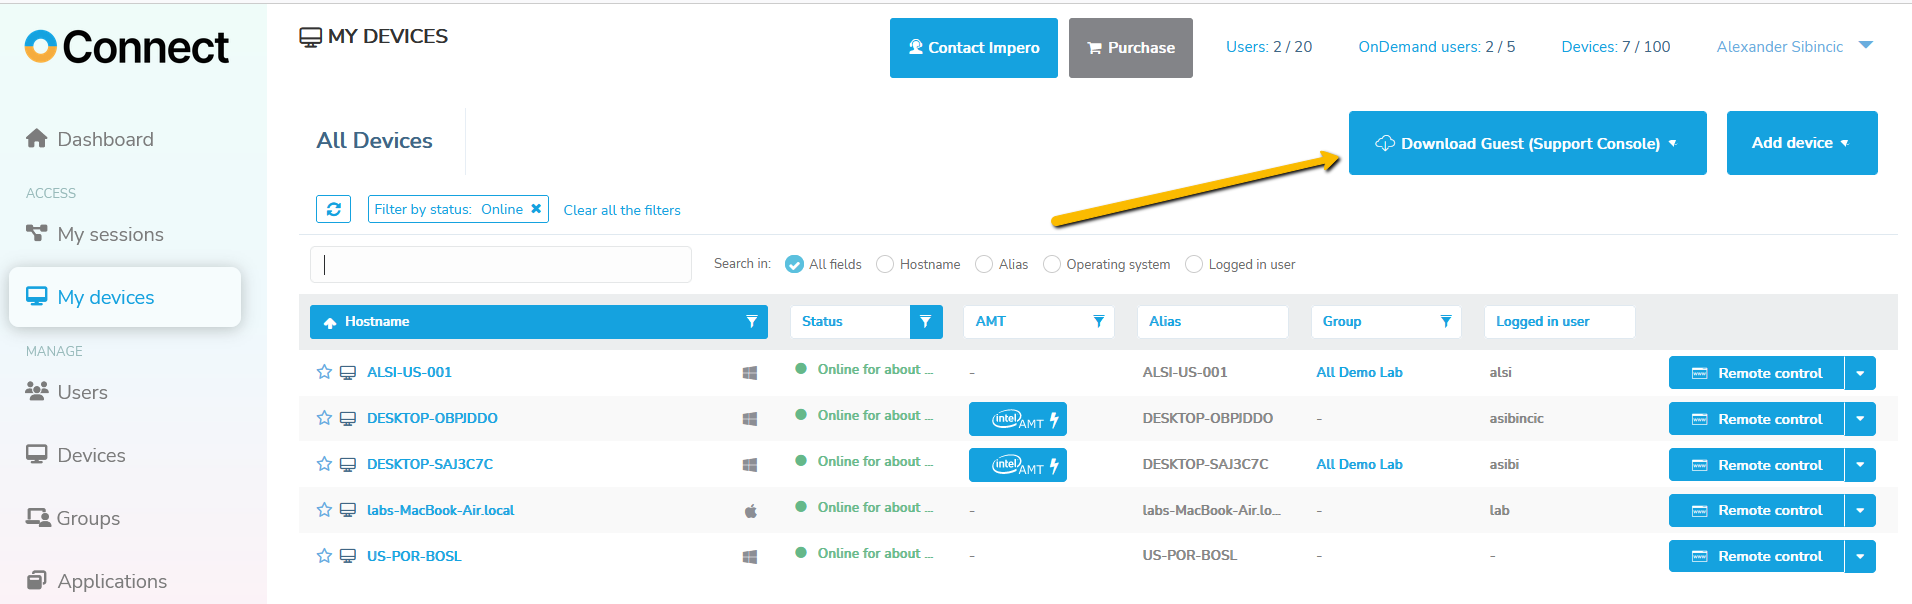
Management console - the Portal provides a browser-based interface that allows users to:
- Manage access control
- View connected devices (Hosts)
- View audit logs
- Create remote sessions using a lightweight support console
- Activate and control supported Intel vPro/AMT Bios remotely
Deploy the Portal:
- Typically a customer will start a trial account in the Portal and this will become their production account, when sales closes a deal in Dynamics's a Zendesk deployment ticket is created so someone from the deployment team can modify the account in the Portal back-end. Connect "Super Admins" have access to modify accounts and will change the account information to reflect the duration and device count of the contract.
- Internet access to the Portal from all devices participating in the platform is required, outbound initiated connection logic is used so the traffic can traverse most firewalls Portal Whitelisting Requirements
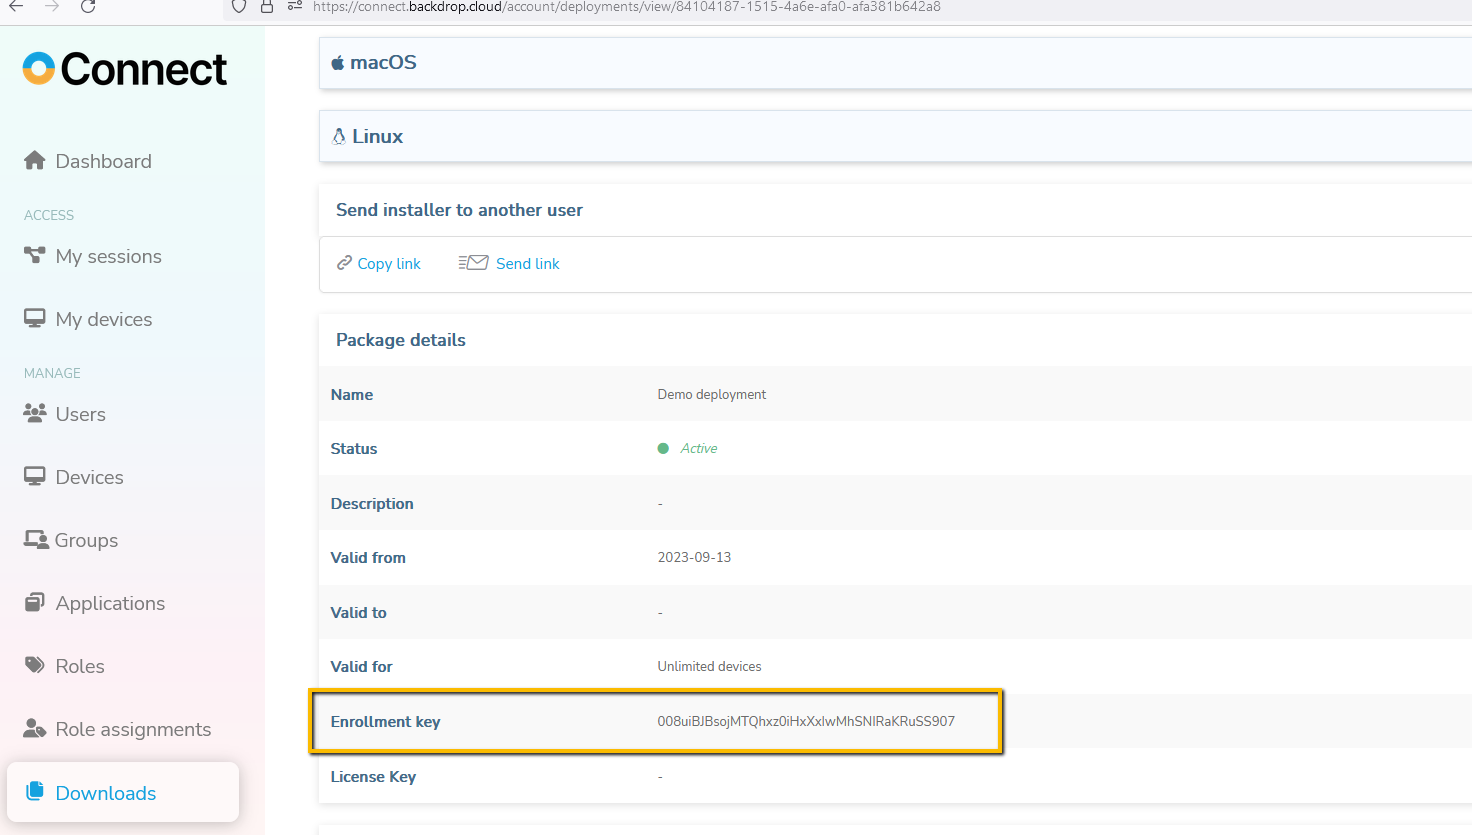
- Install Host module on all devices that require remote access, the Portal has a “deployment package” option for automated install packages that can be sent to end users or installed locally, this package already has a enrollment key from the account embedded into it, it can be downloaded once inside the Portal from the "Add Device" link from the My Devices page or from the Deployment Package link; or an MST package can be constructed. Detailed step by step instructions can be found in this manual for all OS's: Portal Quick Guide
- An MST template can also be created for pre-configured deployment through Intune or SCCM type tools. A custom MST can also be uploaded to a Connect Deployment Package in the Portal. Link to article with instructions. MST creation utility
- Manually install the Host locally or send a link via email or copy a link to the install package
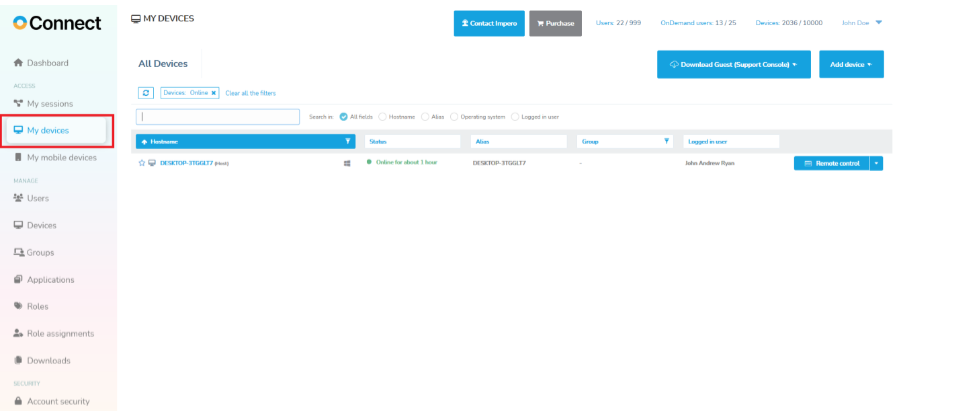
To install the Host on the device that you are on, proceed as follows:
1. Go to the My devices tab.
2. Click on the Add device button3.Click on the Host installer button.
4. Click on the Online installer button.
5. Click on the downloaded executable file when downloaded from the browser downloads location. The installation process begins, and it only requires that you accept the End User License Agreement.
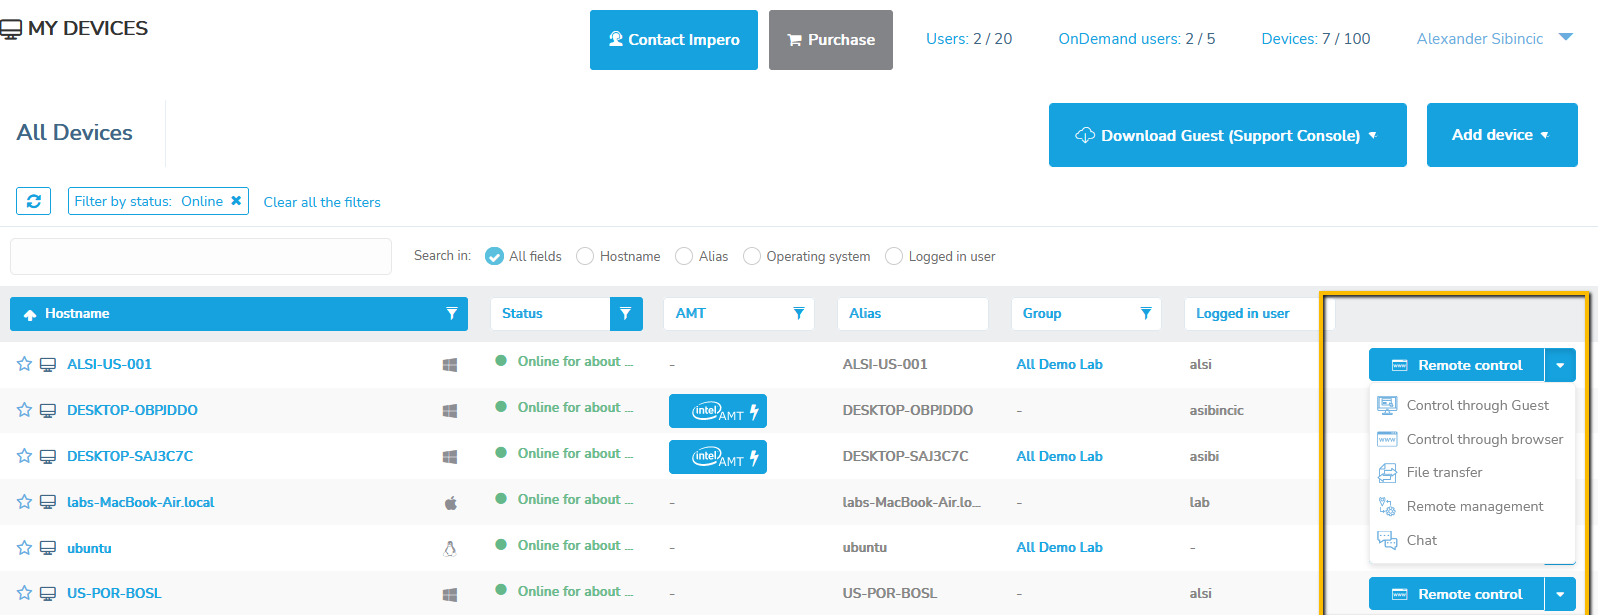
- 6. The Host will appear in the My Devices view as long as the logged in Portal user is allowed access. By default all users can access all devices until role assignments are created and the default role assignment is modified.
Another deployment option is an MST package that can be created and installed from InTune or some other deployment tool.
- MST creation instructions can be found in this link : MST Creation Tool
- Important information when building a Host package for a Portal deployment:
- Make sure to enter the Enrollment key from the deployment package in the Portal.
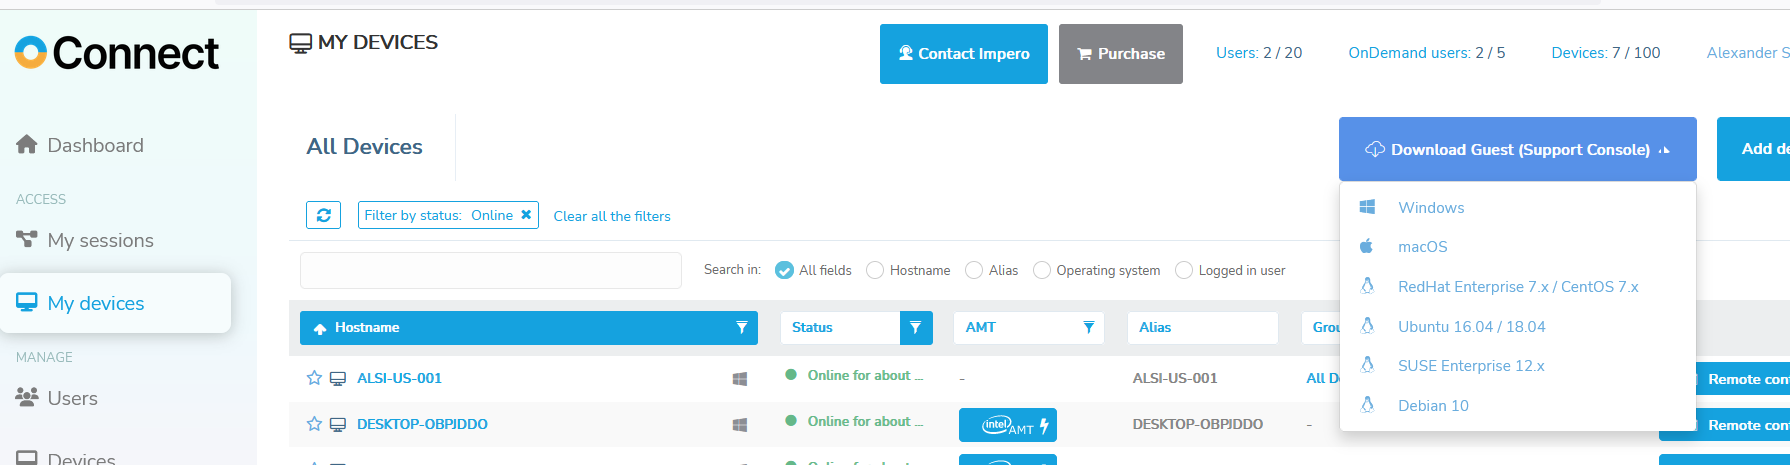
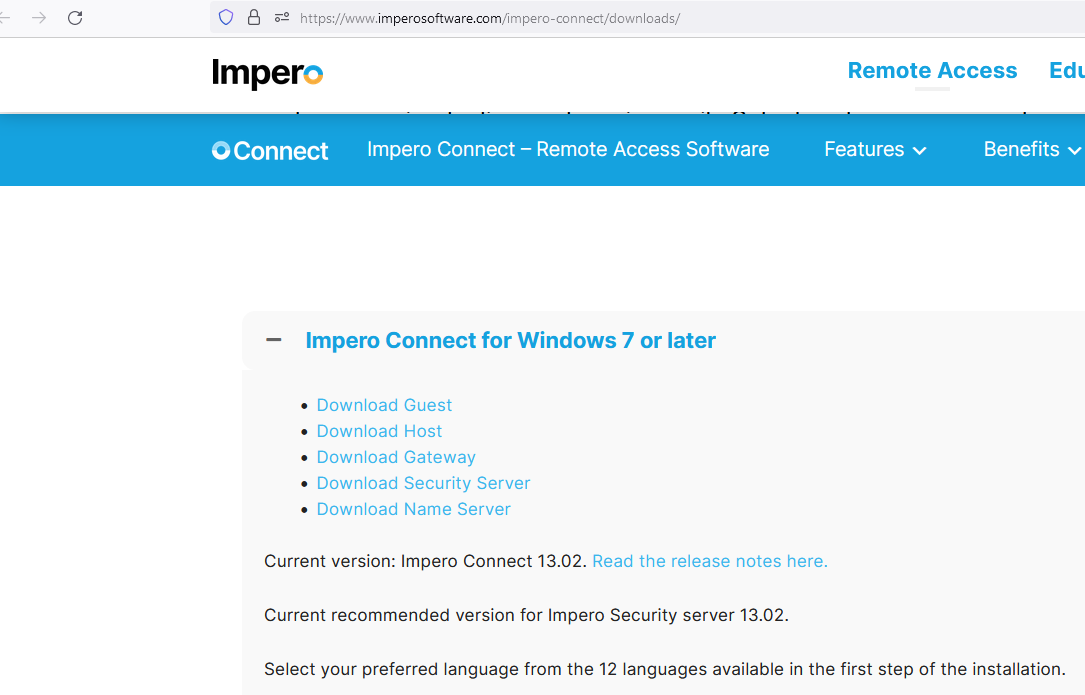
Install the Guest module for Portal Deployment on support team computers either locally or on Terminal server or Citrix platform. The EXE installer can be downloaded from the Portal in the upper right corner from the Portal "My Devices" view and the MSI installer can also be downloaded directly from this link:
Download Windows Guest
Link to other OS installers
- How to install Guest on Terminal Server and Citirx
- Click the link to initiate an install
- Installing from this link in the Portal will only allow Portal communication profile connections, for access to TCP connections the Guest must be installed using the MSI file and a license key is required.
- The drop down list will will also give you a choice as to which OS you want to install the Guest on, the focus will be on Windows:
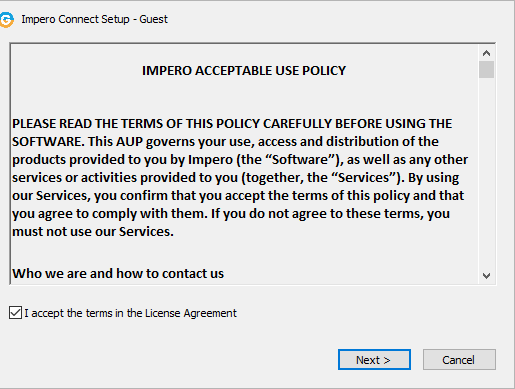
- Clicking Windows will download a exe file in the browser, once downloaded click it to start the install. Accept the License agreement and click next.
- The Guest will install without any other steps and be ready for use, type Guest from the Windows menu to start the Guest or initiate a session from the browser My Devices section and the Guest will start automatically.
- Detailed information are found in these links:
- MST creation instructions: MST Creation Tool
- Impero Connect Portal User's Guide
- Portal Quick Guide
Connect Portal (VPC)
Another deployment option for the customer is the Portal VPC which provides an isolated, single-tenant cloud environment dedicated to the Impero Connect Portal. Configured as an extension of a corporate data center, the Portal VPC is a managed network segment that offers seamless connectivity for all users and devices based on the architecture and requirements that are used in the public cloud. Details can be found here: VPC Options
On Premises Deployment
All connectivity traffic stays on LAN/WAN/VPN infrastructure.
No Internet components required.
Customers control all modules including authentication and MFA components.
Deploy On Premises without Security Server
Install the Host module on all devices on the LAN/WAN/VPN that need to be accessed remotely.
Download the latest version of the Host module: Host for Windows for other OS's refer to this page for downloads: Download Linux, Mac and previous versions
Install the Host without Security Server
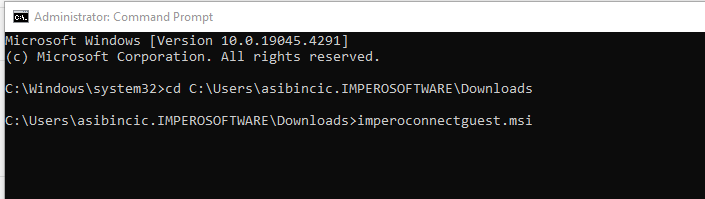
- If you are performing this installation manually, you will have to navigate to the folder containing the MSI via an elevated command prompt and initiate the install.
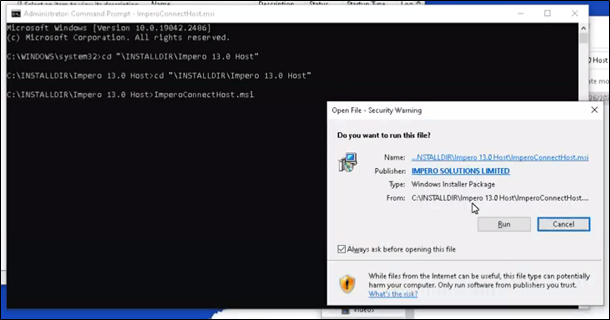
In this example the install can be found in C:\Installdir\Impero 13.0 Host\ ImperoConenctHost.msi
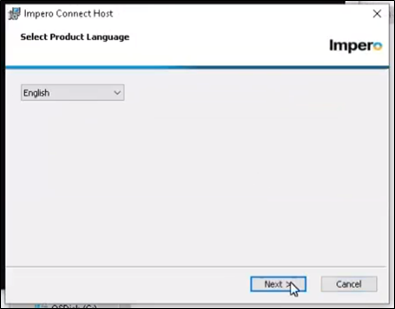
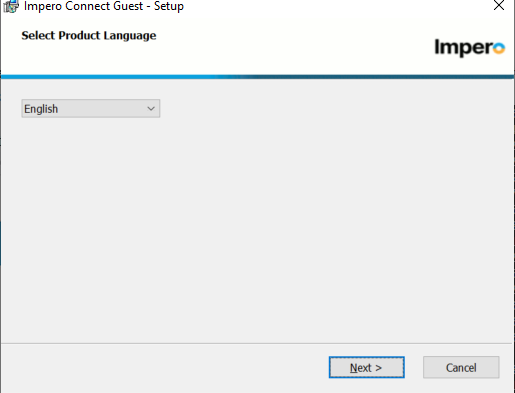
2. Select your desired language and click ‘next’.
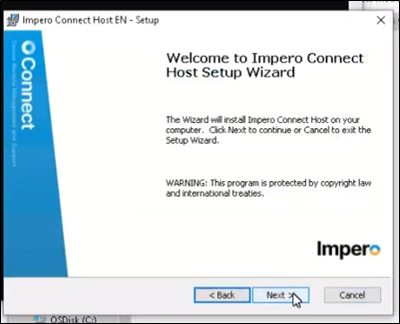
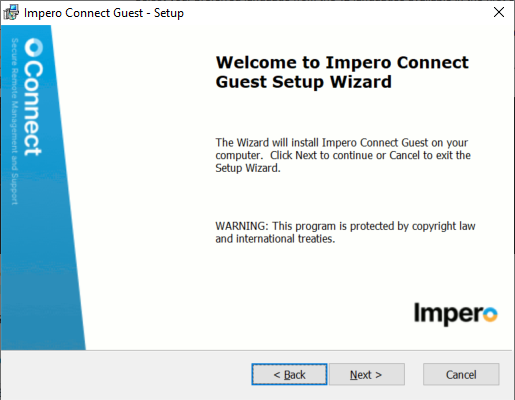
3. Continue into the setup wizard
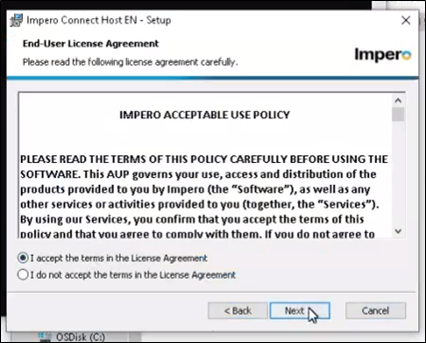
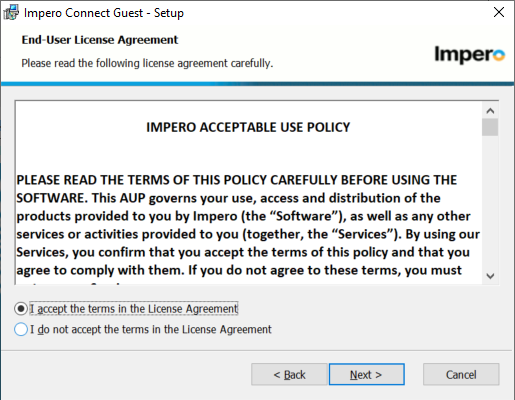
4. Accept the End-User License Agreement.
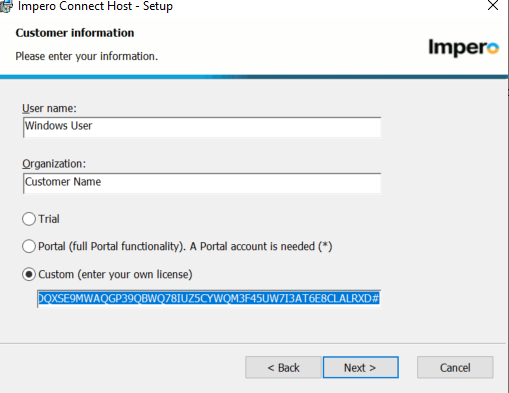
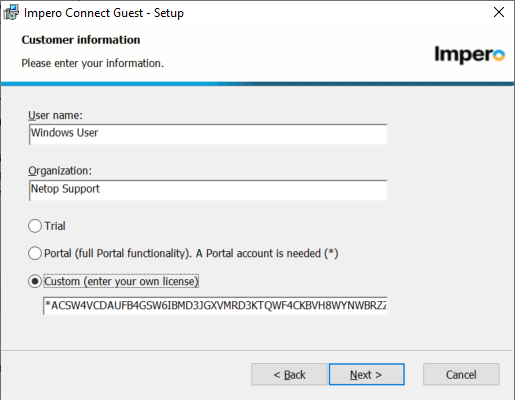
5. The ‘User Name’ and ‘Organization:’ fields should be whatever the customer wants, Select the Custom radio button and enter your license key for on premises deployment. This enables the TCP communication profiles.
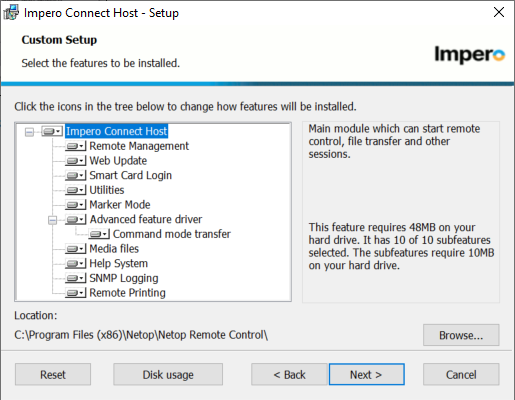
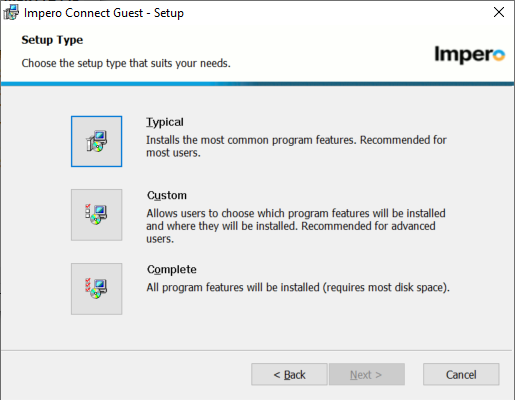
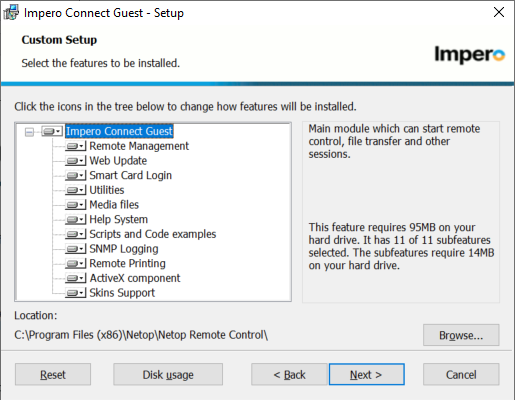
6. Select the ‘Custom’ setup type from the list.
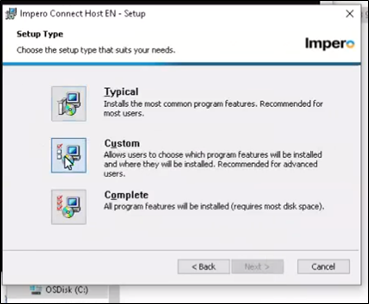
7. In the custom setup section, disable unwanted features by selecting the drop down: ‘Entire Feature will be unavailable’ for the items not needed. Web update is typically disabled in large organizations for version control, all others can be evaluated based on use case. If unsure keep all the defaults.
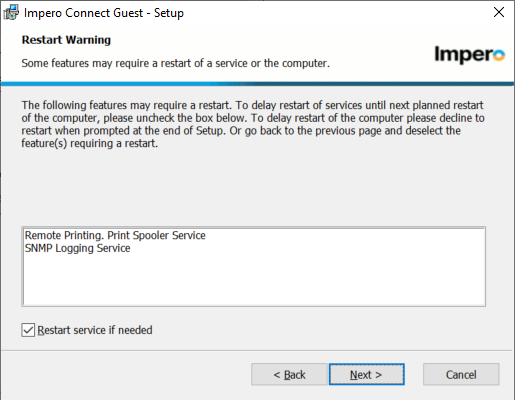
8. After selecting ‘Next’, you will arrive at the Restart warning screen. Leave the ‘Restart Service’ check box checked, then continue.

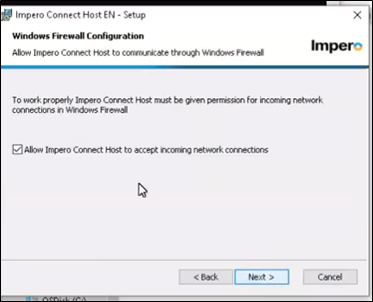
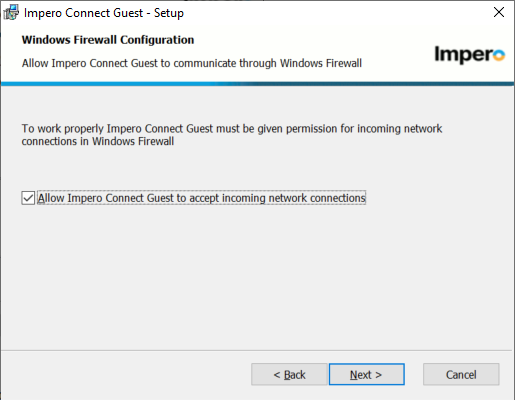
9. Make sure the box for Windows firewall connection is checked to allow Impero Connect Host to accept incoming network connections.
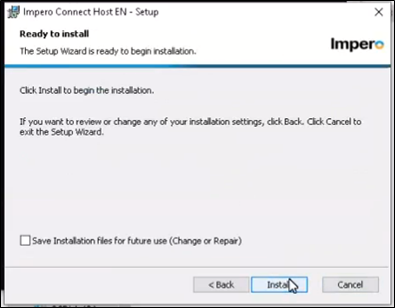
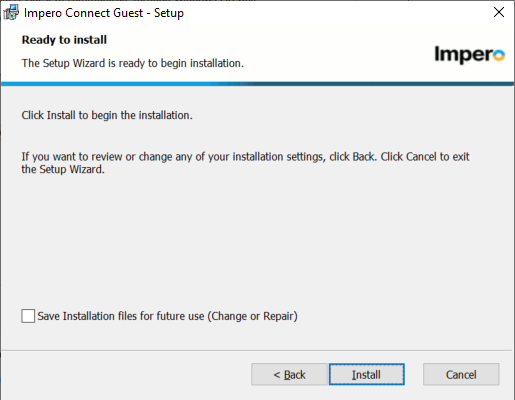
10. You are now ready to begin the install. "Save installation for future use" copies the MSI file to the local c\program files folder and is not necessary but it's up to the customer. Allow the installer to complete.
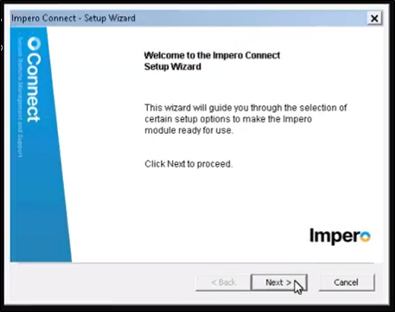
11. After the installation finishes, you will be prompted with an Impero Connect - Setup Wizard.
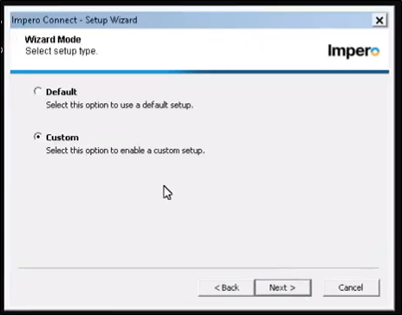
12. In the next section you will select the ‘Custom’ option to begin a custom setup.
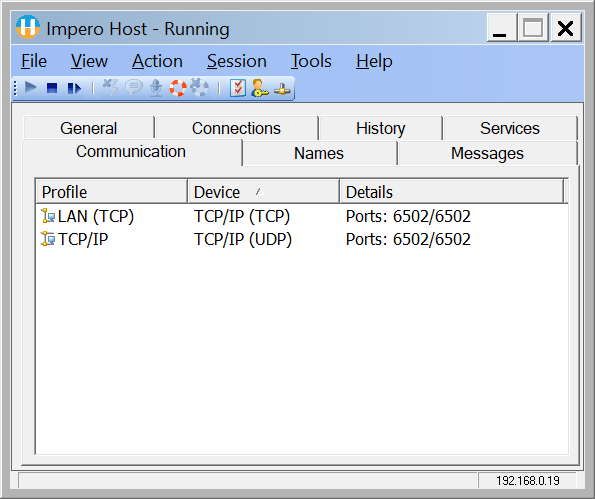
13. The following section will cover the communication profile. In this section, make sure to only select ‘LAN (TCP)’ and ‘TCP/IP’.

14. Select the Host Program Options, the default choices are typically fine but explore the advanced options for all the choices. Click next...


15. Choose the authentication type, for a detailed description for all the choices go to page 151 of this User Manual
To summarize:
All Guests have the same password - all users that connect will be prompted for the same password and receive the same role assignment. Good for simple deployments that do not require more security.
Each Guest has its own password - Individual "Impero Connect" users and groups can be created and given unique security roles for more granular security. Not the best security but better than one password.
Use Windows Security Management - User will be challenged with local or domain users that are in the local groups of the Host computer and have been given permissions for remote access. AD or local users or groups are used to give granular access roles for remote sessions. Host will communicate to AD via Windows Networking to validate credentials or query local security to allow access.
Use centralized security management with the Impero Security Server - this will instruct the Host to use the Security Server to authenticate the user, details on this are in the next section.
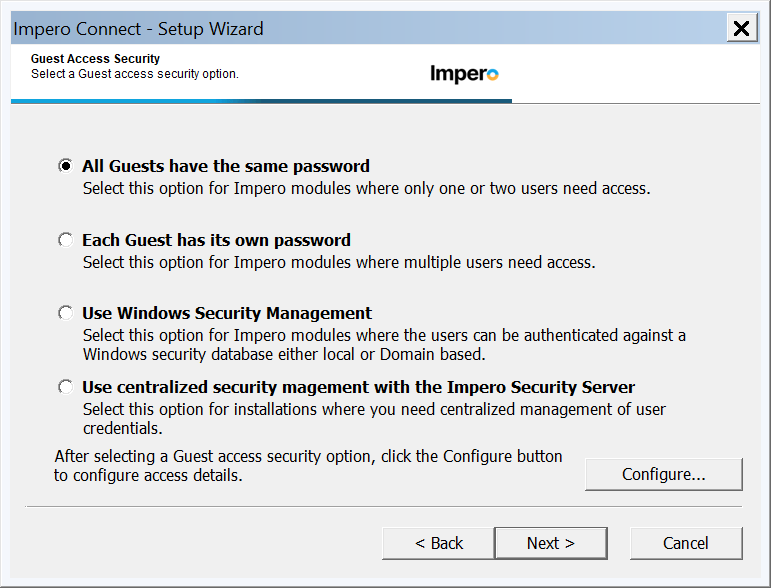
16. Depending on the choice for authentication, set it up per the use case requirements, they can always be changed after installation so if you're unsure just choose the first one and enter a password.

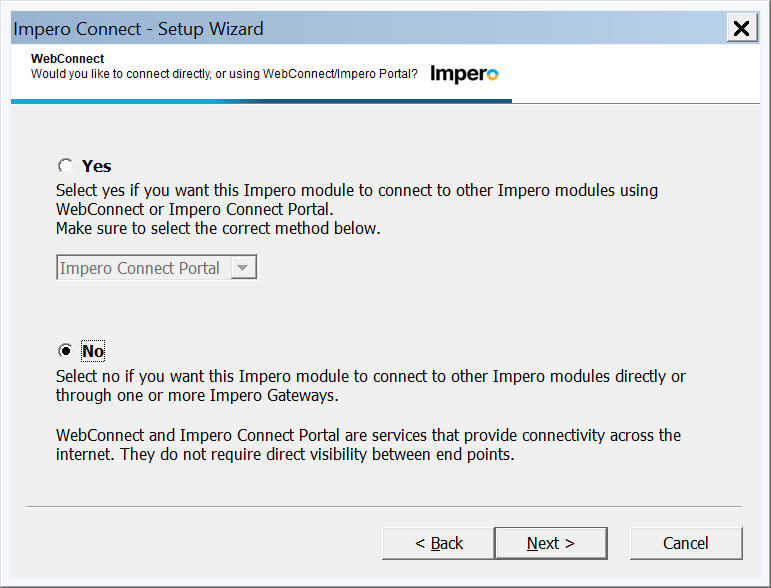
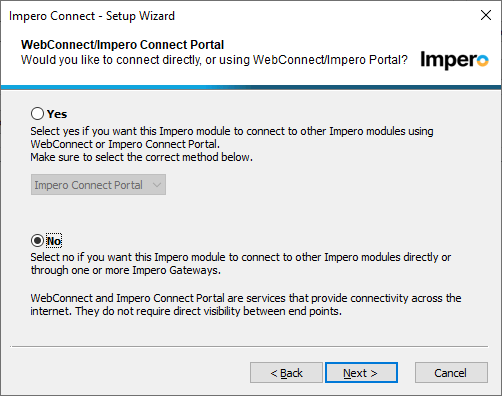
17. If this is an on premises deployment then answer no to adding the Portal communication.
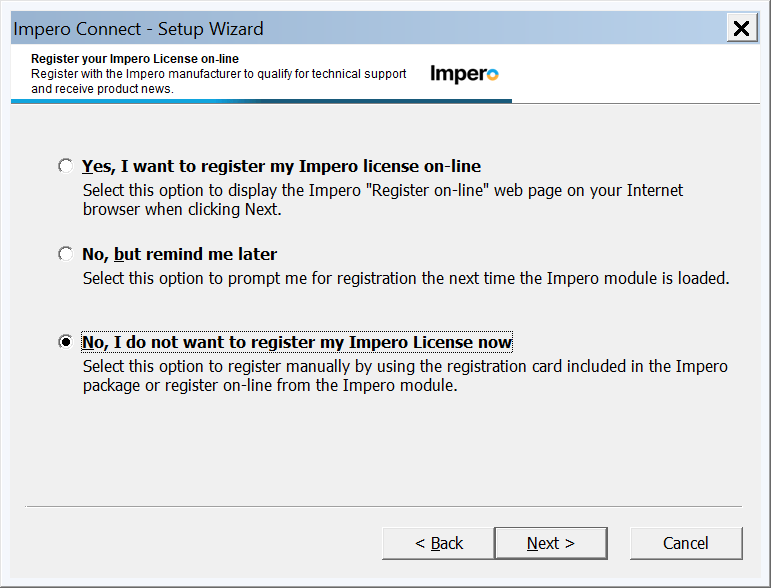
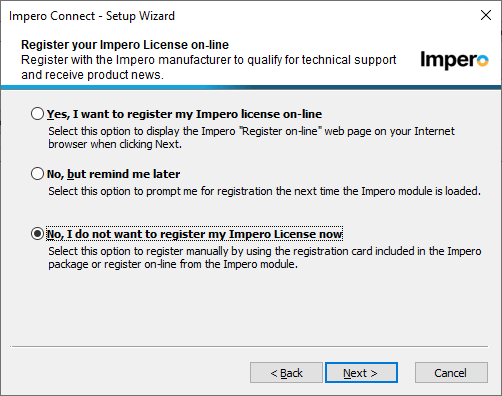
18. Typically registration is not needed, it wont affect the install either way, it just sends them to our web site.
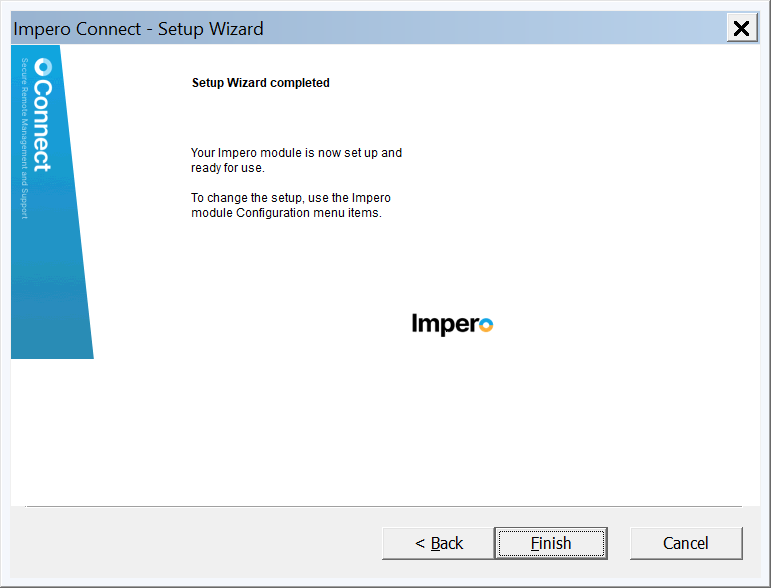
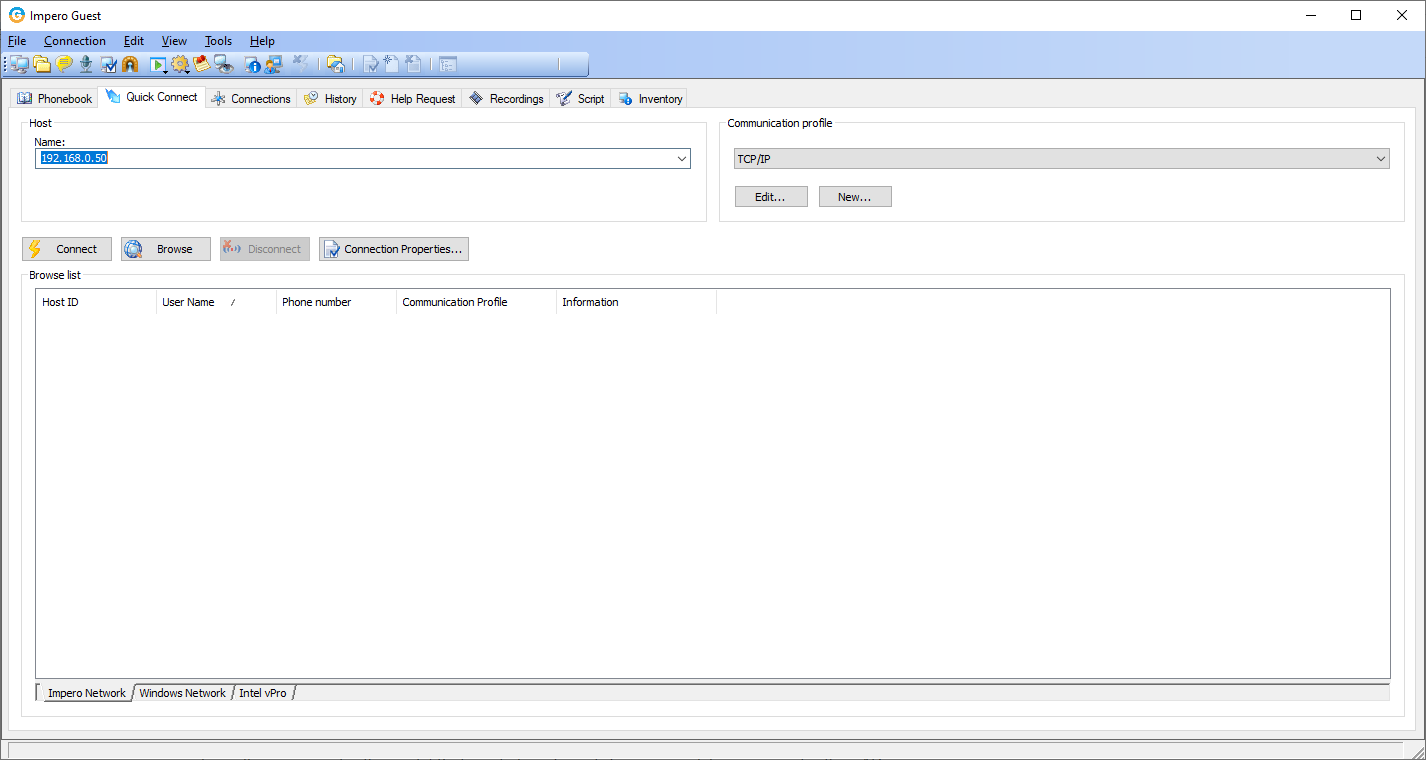
19. Installation complete, you should now be able to connect over port 6502 TCP using the "LAN TCP" communication profile or UDP 6502 using the "TCP/IP" communication profile in the Guest module.
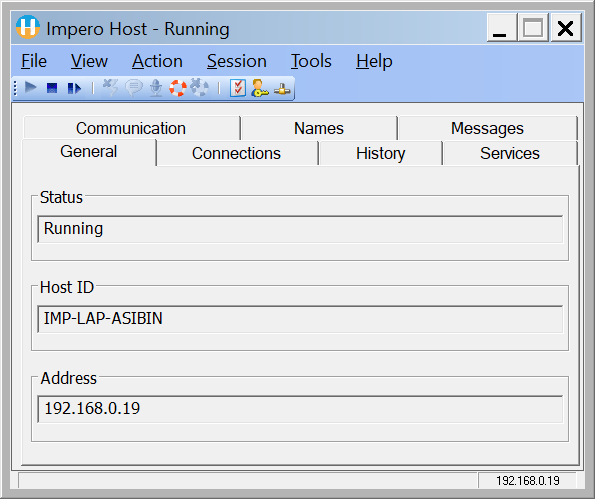
20. Verify the Host is running and waiting for connections, it will run in the system tray of Windows for access to the GUI. For Linux and Mac see this guide: Linux and Mac users Guide
Install the Guest module on the support team computers, this configuration will remain the same if using on premises with or without Security Server.
- Go to the download page and download the latest version of the Guest: Connect Downloads
- Start the MSI from a cmd prompt started as administrator (this step may or may not be needed depending on the security policy on the computer) or just click the MSI file after download from Windows explorer
- Choose the language and choose next
- Click next to start the install
- Accept the License agreement
- Select the Custom button and enter the license key, this will enable the TCP connections.
- Choose Custom to continue
- Choose the features desired, leaving the defaults is typically fine but disabling the web update is recommended in most larger organizations for version control.
- Click next to acknowledge the restart warning, a restart is not typically needed.
- Click next to accept incoming connections, this is needed to support some features like "Help Request" and logging to the Security Server. See User manual for details.
- Click install to begin the process, you don't need to save the install file but you can, its harmless.
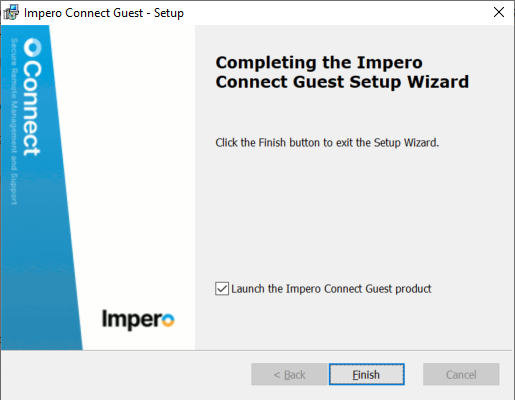
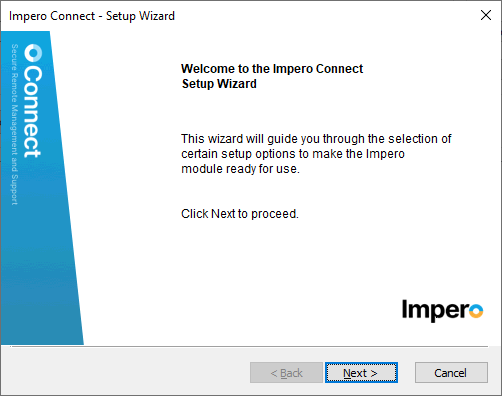
- Click finish to start the "Setup Wizard"
- Click next to continue
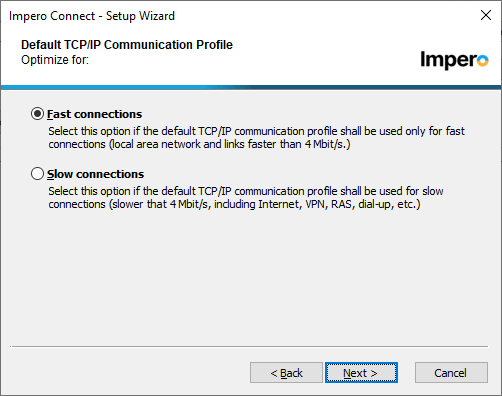
- Leave the "fast connections" choice, this simply sets some of the communication profiles settings for optimized UDP and TCP packet sizes.
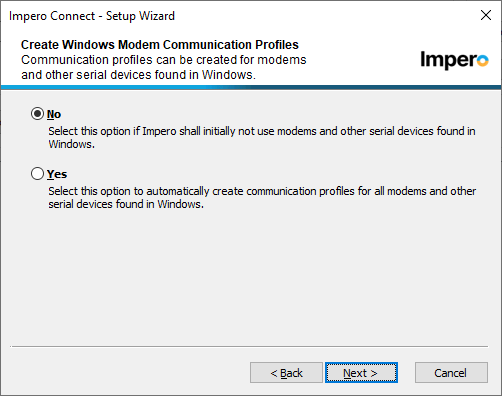
- The customer probably doesn't need modem support
- For on premises the Portal profile is not needed.
- No registration is needed.
- The Guest is now ready to make connections. Enter the IP or resolvable computer name in the Quick Connect tab.
- For more details on the Guest configuration see this Users Guide
- See article for details on how to deploy Guest on centralized Terminal or Citrix server: How to install Guest on Terminal Server and Citirx
What does it take to deploy On Premise with Security Server module:
Install and configure the Security Server module (there should be another training module for this which is basically summarized in this guide) Best way to learn Security Server is in a lab environment with an AD domain and SQL server.
Guest and Host modules need to be installed manually or packaged up with configuration that is required for Security Server authentication.
Configure the Host configuration to use the Security Server:
Complete details can be found on page 24 of this guide: Security Server setup Guide
1. Open GUI of the Host you want to use with Security Server
2. Make a note of the Host ID as it is displayed in the General tab. You might want to use this later when making the role assignments in the Security Manager.
3. On the main menu click on the Tools and select Communication Profiles option. The Communication Profile Setup is displayed.
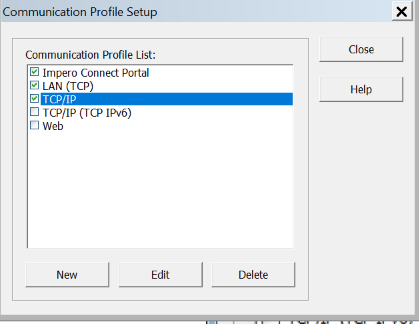
4. Make sure the TCP/IP communication profile is selected. click the Edit button.
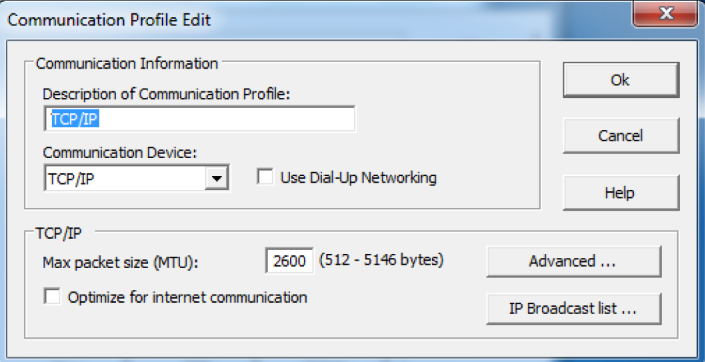
5. Click on the IP Broadcast list...button.
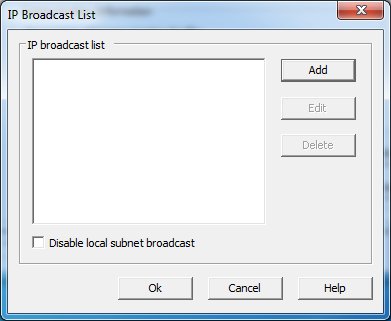
6. Click on the Add button.
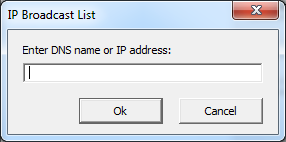
7. Specify your Security Server DNS name or IP address and click on OK. Using a DNS makes it easier if the server needs to be updated in the future, simply change the DNS record to thew new server without having to change the Host configuration.
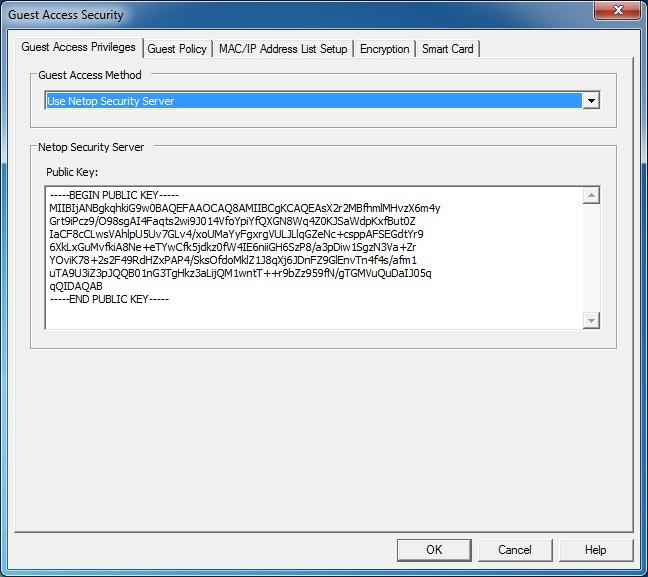
8. On the main menu click on Tools and select the Guest Access Security Option, from the Guest Access Method drop-down list and select Use Impero Security Server option and click OK.
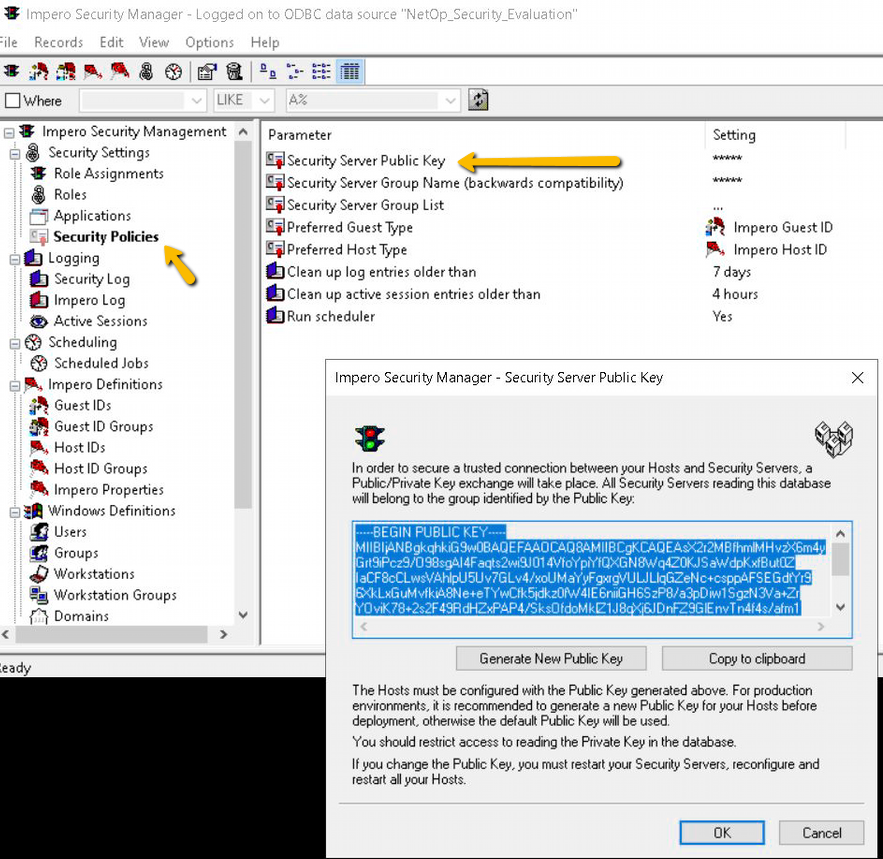
This "Public Key" must match the one on your Security Server, this can be found in the Security Manager application running on the Server. The default key on the server and host are the same, but in a production environment its recommended you create a new key in the server during installation of the server.
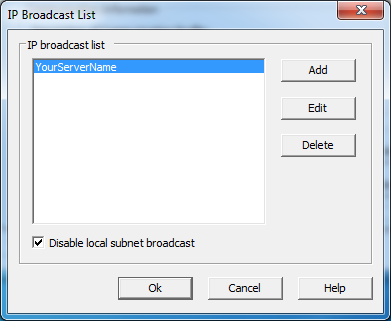
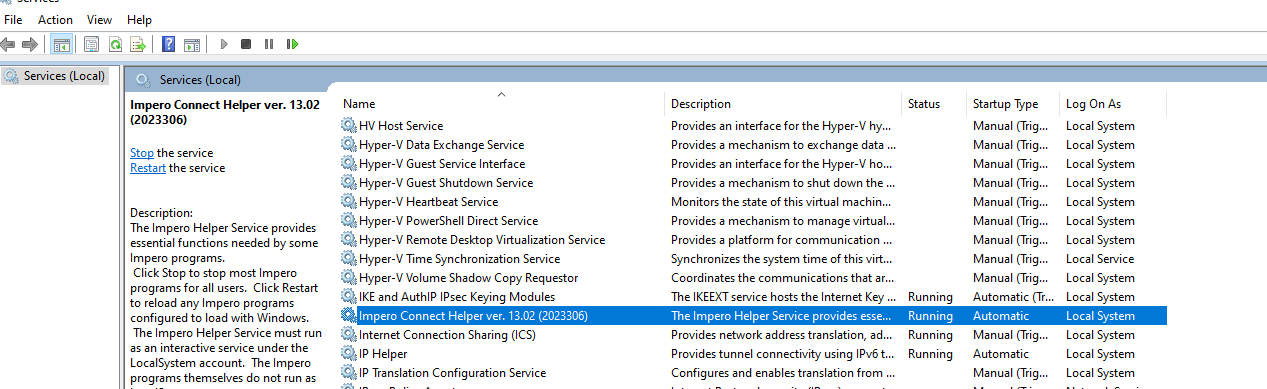
9. Because the entries in the broadcast list are cached in memory a restart of the "Impero Helper Service" in Windows Services is required. Restarting the computer will accomplish the same thing. Once restarted the Host will be ready to use the Security Server for authentication.
Authentication flow using Security Server
- When the Guest initiates a connection attempt, the Host module will do a uni-cast message to locate the server based on the entries in the “IP broadcast List” under the TCP/IP communication profile on UDP 6502 by default,
- It then uses a proprietary encryption key to encrypt the traffic, this is a propriety key exchange method and is set in the Host and Server configuration.
- The server processes a “role assignment”, a security policy to determine if the user is allowed access to the remote computer based on groups of users and devices. These settings are saved in the Server SQL database.
- The server will validate user credentials and group membership in AD by using an LDAP or Windows Networking lookup to the domain; or local Impero Connect users can be used.
- Once allowed access the Connect admin will determine what role is to be applied, these roles comprise of all the features used in Connect, for example is the user allowed to file transfer or does this group of remote users require a “confirm access” step that prompts the remote user or administrator to allow the access manually.
- For detailed instructions to install and configuration options for Security Server: https://support.imperosoftware.com/hc/en-gb/article_attachments/14437441992467
- More Security Server documentation: https://support.imperosoftware.com/hc/en-gb/sections/10307066104979-Security-Server
Test Questions:
- · Describe what is Netop Connect from a high level?
- · Name a few use cases where Netop can be used?
- · What are the 2 deployment options available for Netop remote control?
- · What is the Security Server?
- · Describe the options for authentication to remote sessions?
- · Which of these authentication methods would you recommend if the requirement is maximum security?
- · What are the 2 processes that run when the Host is installed?
- · Describe the deployment options for running the Guest module?
- · Describe what the Connect Portal is, what are the 2 primary functions?
- · What is a role assignment?
- · How would you collect debug logs in the Host and Guest modules?
- · Describe the difference between RDP and console sessions and Host Netop Host runs in each session.
- · How do you install Netop Guest on Terminal Server/Citrix server?
- · Which deployment option would you recommend if the requirement is to support devices over the Internet and why.
- · Which OS’s does the Netop Host support?
- · Describe which connection method could be used if no Host module cannot be installed?
- What is the difference between SQL and Windows authentication for SQL server?
For Trouble Shooting Steps see this article:
Trouble Shooting Steps
Was this article helpful?
That’s Great!
Thank you for your feedback
Sorry! We couldn't be helpful
Thank you for your feedback
Feedback sent
We appreciate your effort and will try to fix the article